Creating and managing virtual applications and machines
Virtual Machine (VM) is a software computer assiged with processor, memory and disk resources, connected to a local network and installed with an operating system. Basically, the virtual machine has all properties and functionalities as a physical server, but with much greater flexibility in terms of portability and scalability.
Virtual Application (vApp) is a logical object in the virtual data center which contains one of more virtual machines. The purpose of a vApp is to unify virtual machines which are logically linked together by enabling start and stop ordering, access to specific networks, simplification in granting permission etc.
Creating a virtual application
Creating a virtual application is simple since it is creating an empty container for virtual machines.
The process is initiated by clicking the New → New vApp button, as shown in the next image.
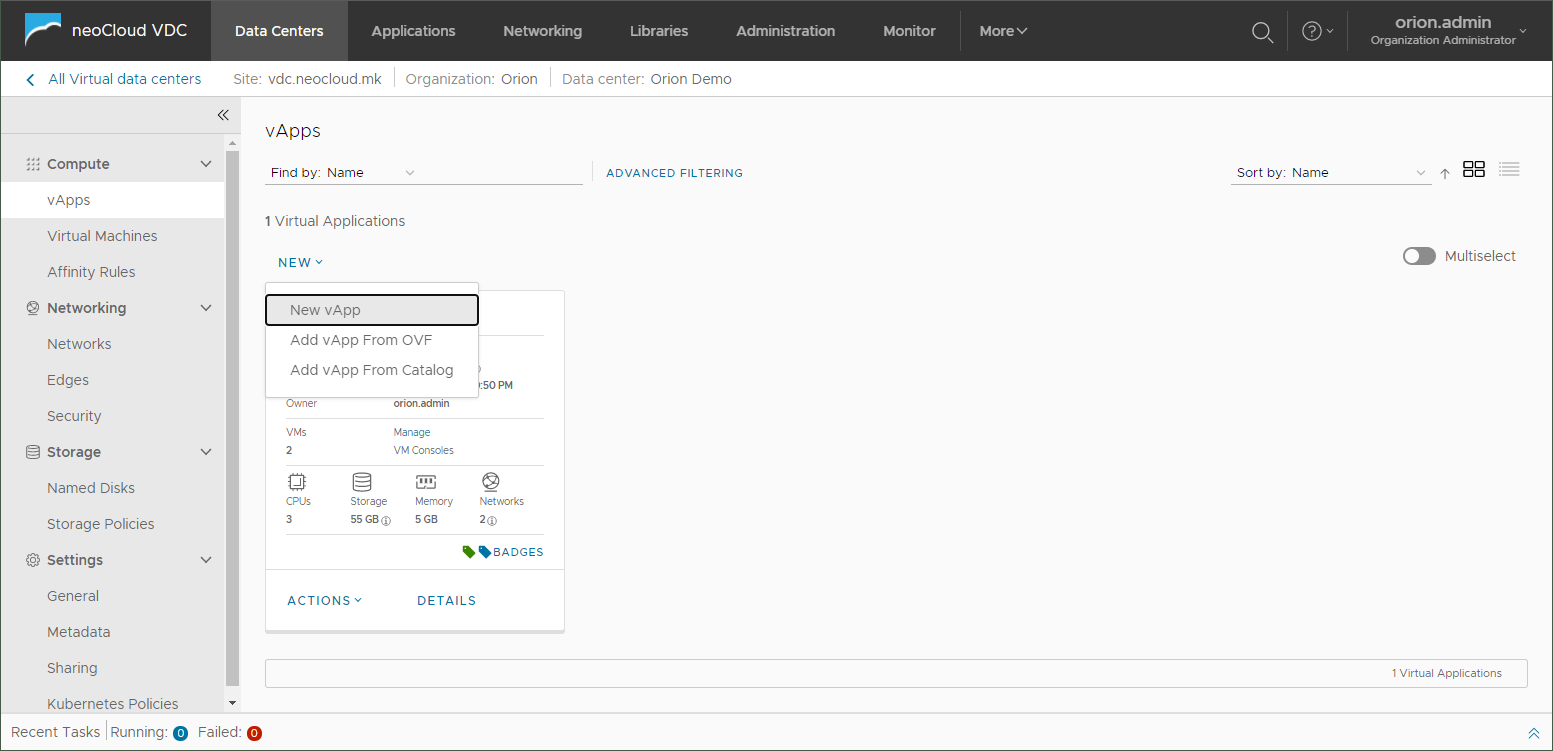
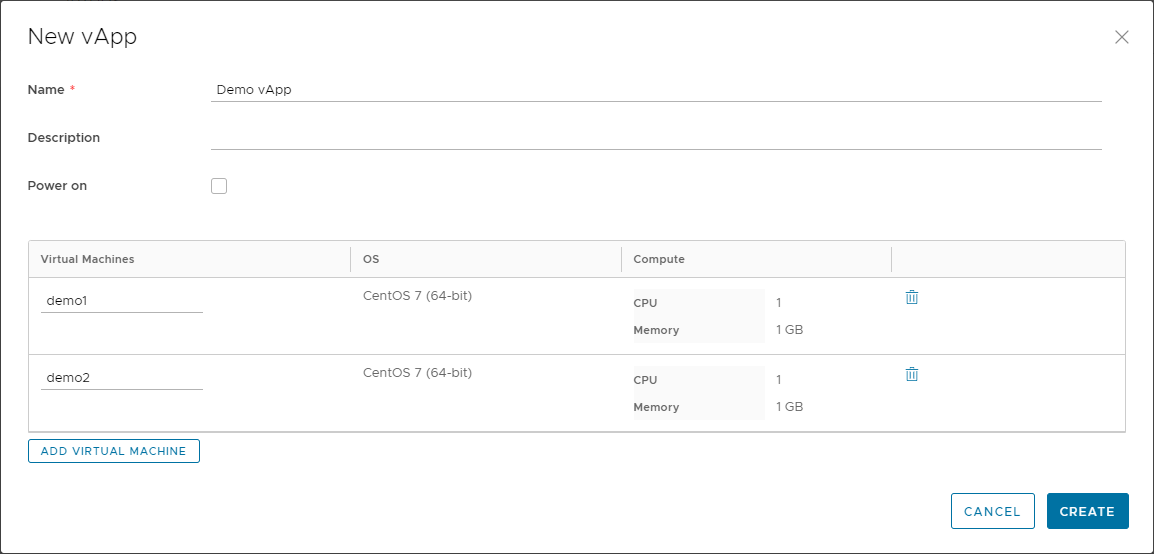
It is sufficient to enter only the vApp name, but the same wizard can be used to initiate the creation of a virtual machine. This process is shown further in this page, in the Creating a virtual machine section.
Another option in the New vApp menu allows for the user to create a vApp through importing an OVF Template. With this option the customer may upload their own virtual machine or virtual appliance from another vendor.
The last option in the New vApp menu is to create one from a catalog, where the vApp and the virtual machine is created in one step, depending on which template is selected. This way is creating a vApp is preferred by customers who want each virtual machine to be placed in a different vApp or when a vApp from the catalog contains more than one virtual machine.
Managing a virtual application
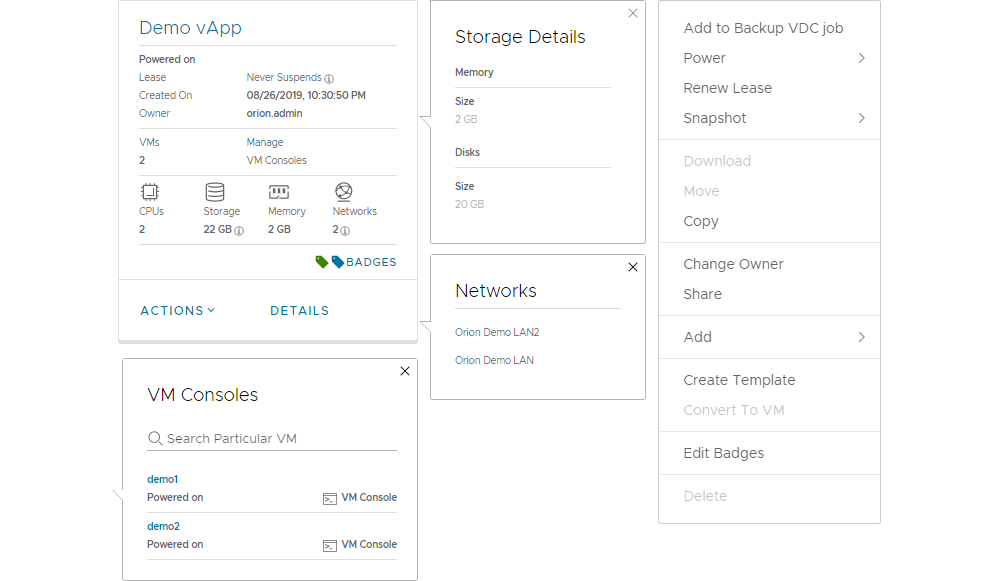
The vApp tile shows a lot of useful information on the status of the virtual application and the resources used by all virtual machine it contains. On the tile there are a few options that enable detailed information and easier access for management. One option is the VMs Manage link that takes the user to the view with all virtual machines in the virtual application. Another option is clicking on the VM Console that allows for opening a virtual machine console from the vApp. In the Storage and Networks icons there is a ⓘ symbol which previews additional information that are shown in the middle of the next image.
The basic management tasks of a vApp are in the Actions menu of the vApp, such as power on and off, copying and moving vApp to another virtual data center, adding a new network or a virtual machine, changing the vApp owner, creating a snapshot on all virtual machines in the vApp etc.
Detailed management of a virtual application is performed by clicking the Details on the vApp which opens another window with several sections.
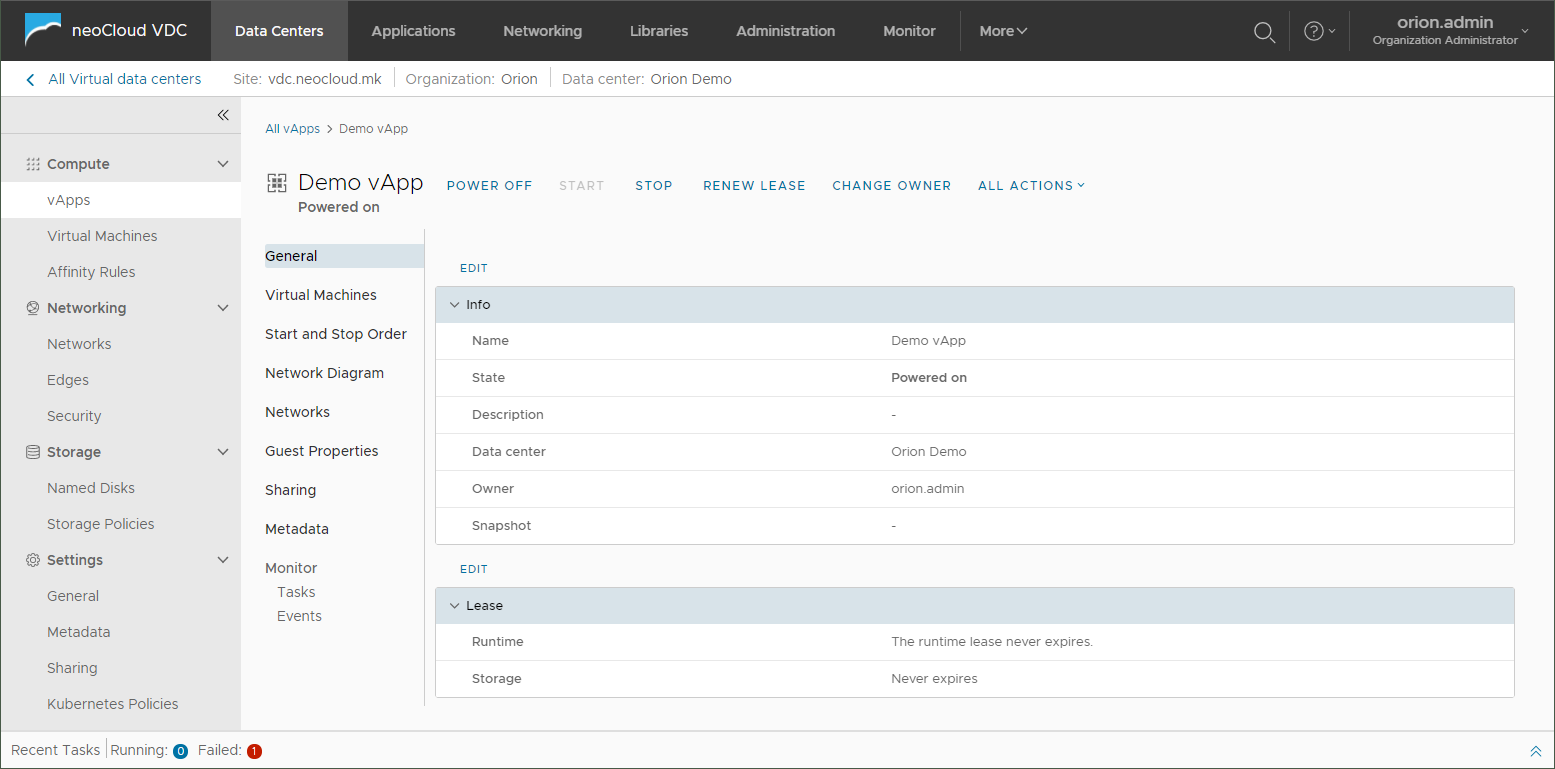
The General section show general information for the vApp such as the description, the virtual data center location, whether vApp level snapshot is present etc.
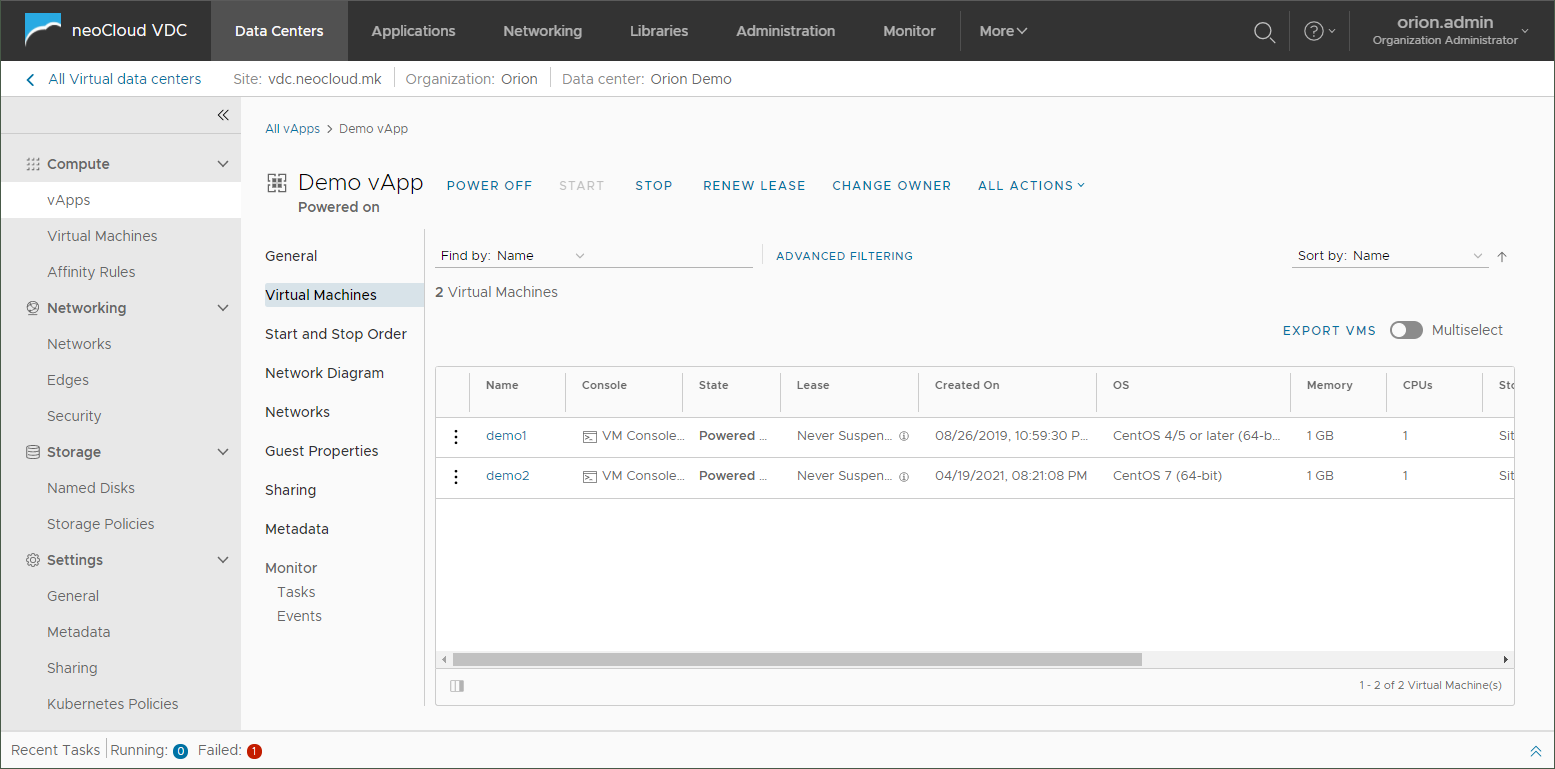
The VM section shows the virtual machines which are part of the vApp. This section of the interface can be used for performing some basic tasks on individual virtual machines or by clicking on a virtual machine to open the detailed management of that virtual machine.
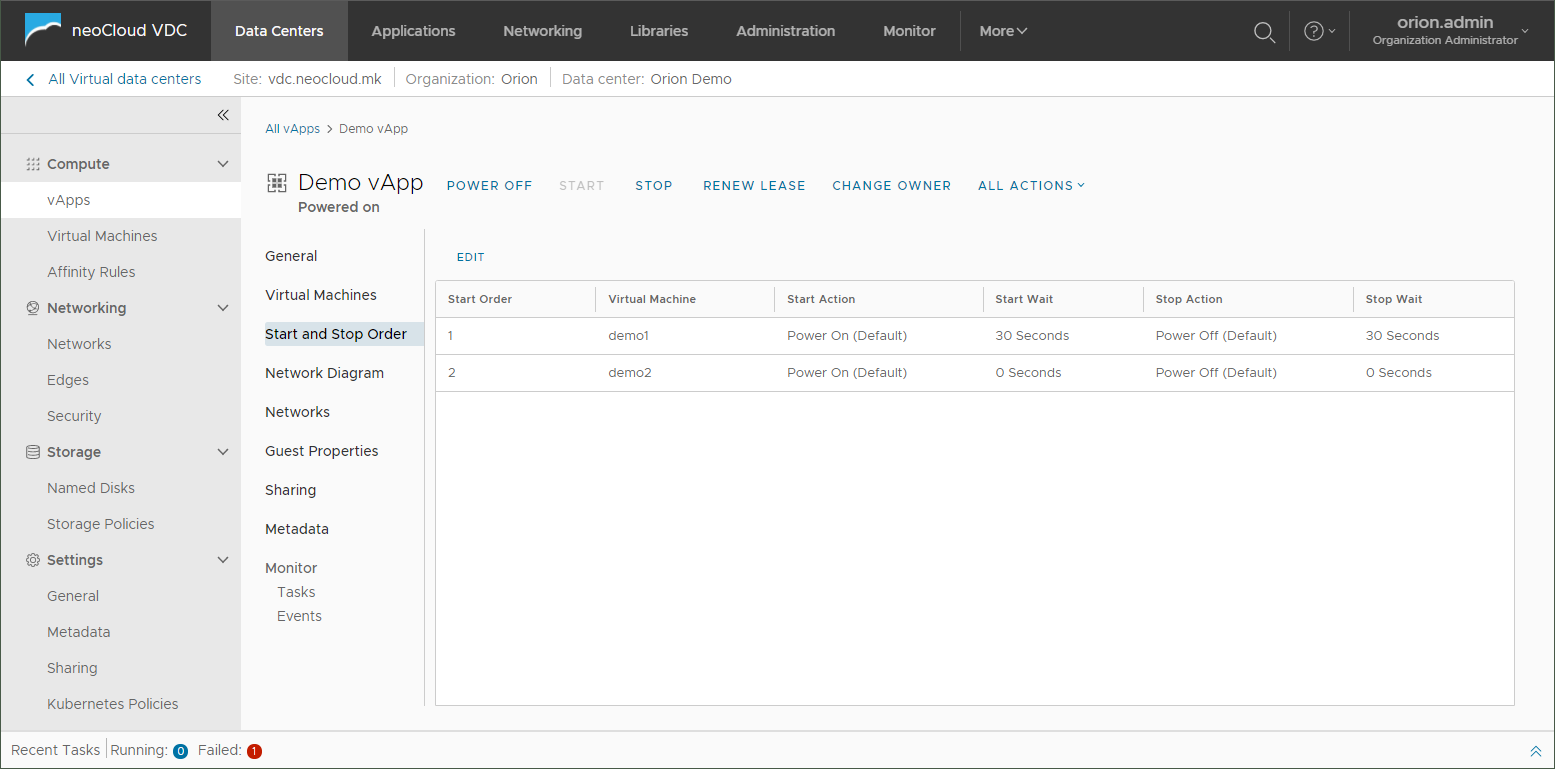
The Start and Stop Order section enables defining priorities for starting and stopping virtual machines in a virtual application, with the possibility to set a time interval for the start and stop actions between each virtual machine. When starting, the order defined is taken ascending order (1,2,3) and taken in descending order (3,2,1) when stopping.
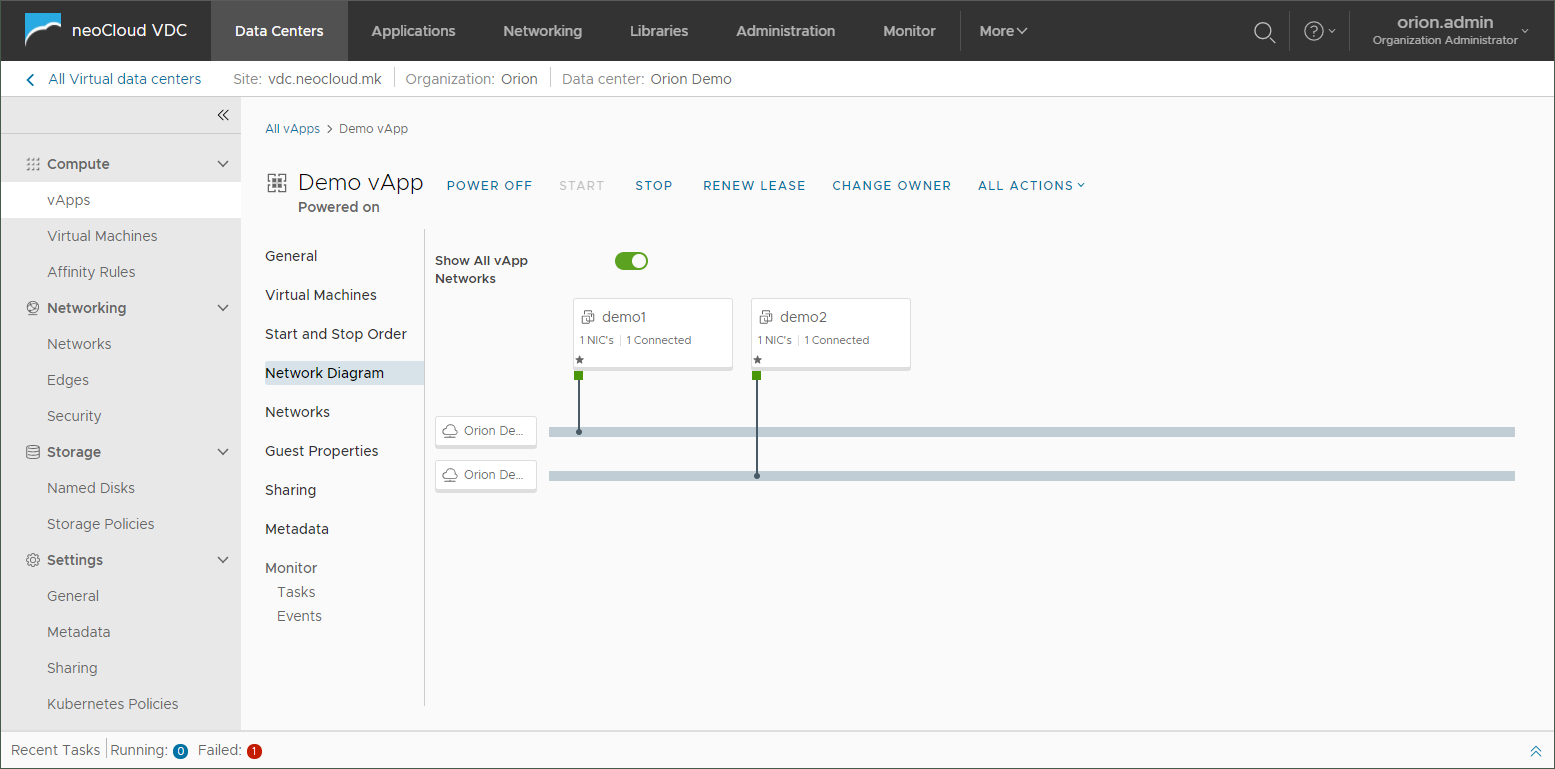
 The Network Diagram tab shows a graphic representation of the virtual machines and their connection to the networks, simplifying the visualization of the customers infrastructure in the virtual data center.
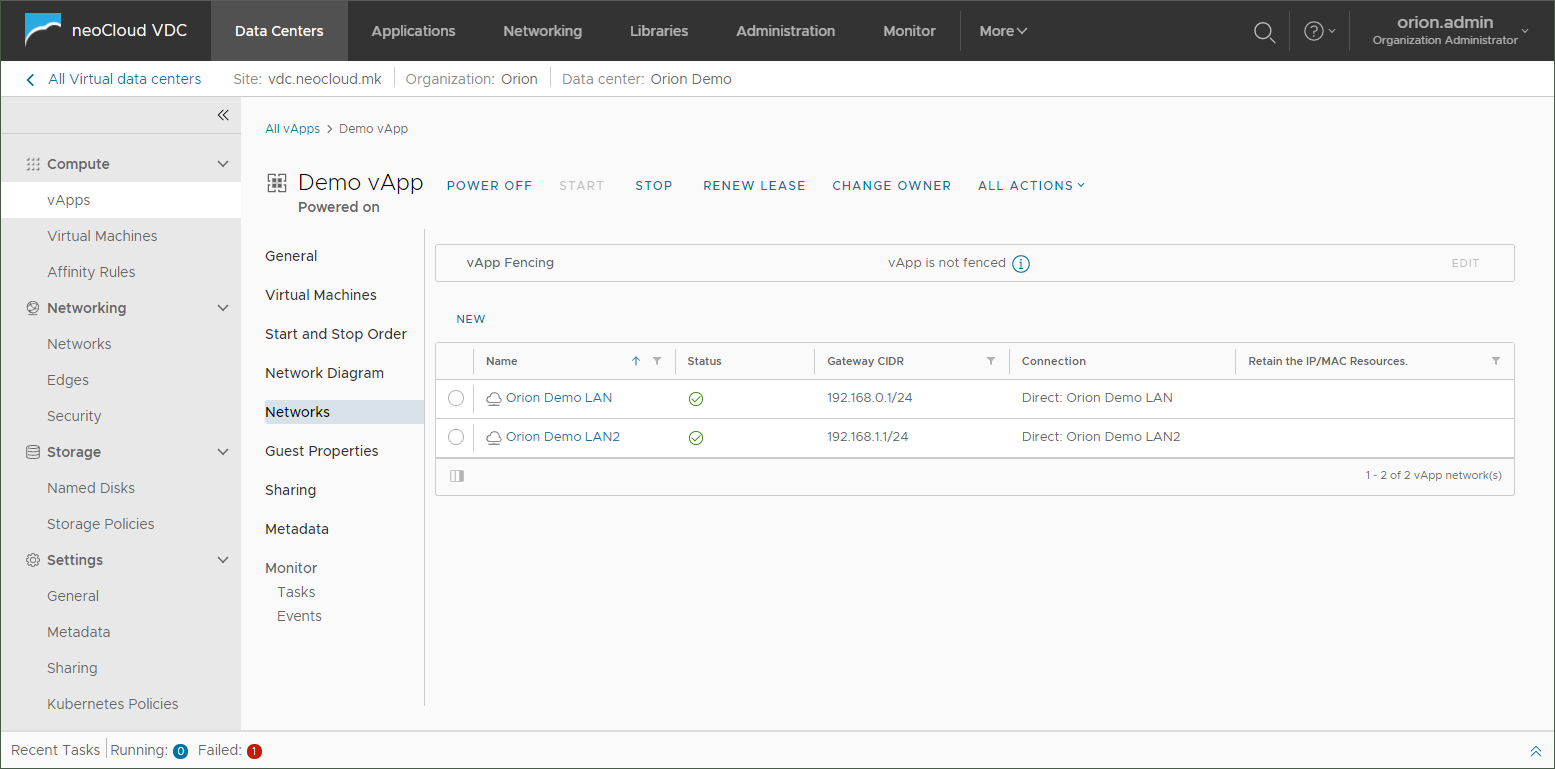
The Networks section of a vApp specifies which organization networks are allowed to be used by the virtual machines in the particular vApp. This way the users of a vApp are limited access to networks which are not intended to be used in the vApp or are isolated for security reasons.
vApp Fencing enables the creation of an isolated network that only exists in the confinement of the virtual application and is most oftenly used when identical virtual machines (with same MAC and IP addresses) need to be powered on. With this option, the customers can create a clone of the production environment for testing purposes without having to change any parameters of the environment.
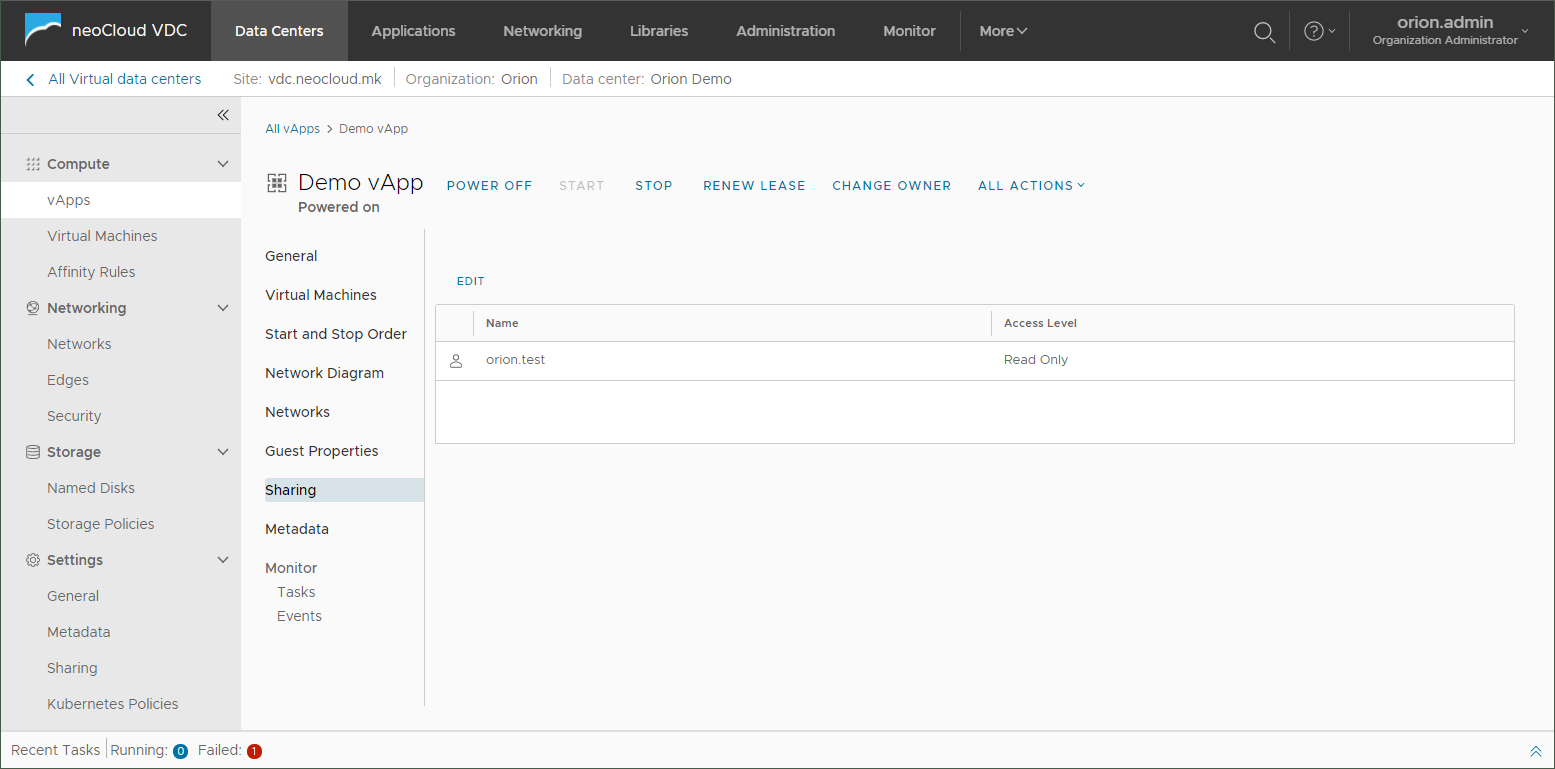
Sharing allows assigning permissions to users who do not have administrative privileges in the organization. By assigning Read Only or Full Control permissions, these users will be allowed to manage the vApps which wound otherwize not be visible for them in the portal.
In the Metadata section the users may define Badges which add color flags that allow for easier identification of virtual applications.
The Monitor section contain the Tasks и Events views where the users can preview the tasks and events related to the application. In these views there an export option in a CSV file.
Creating a virtual machine
A virtual machine in the virtual data center can be created inside a vApp or as a standalone virtual machine. Our recommendation is to create virtual machines inside a vApp, but the final choise is up to the customer's decision. By creating a virtual machine in a vApp there is greater control over the available networks for connecting virtual machines, simplified assigning of privileges to an application which is composed of more virtual machines or controlling the order for starting and stopping virtual machines that compose the application.
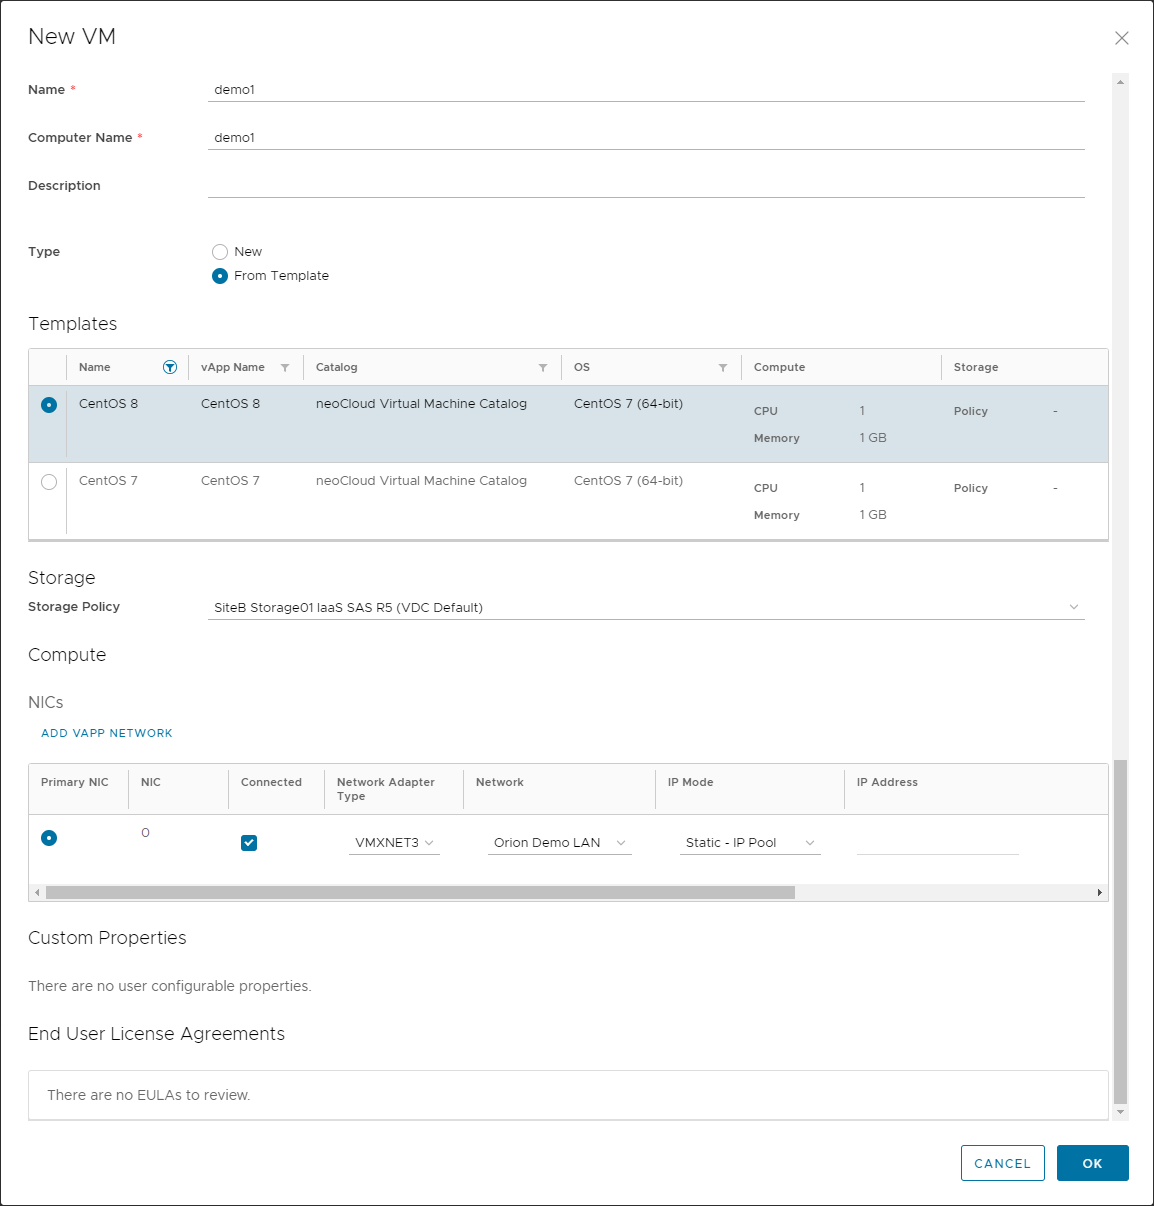
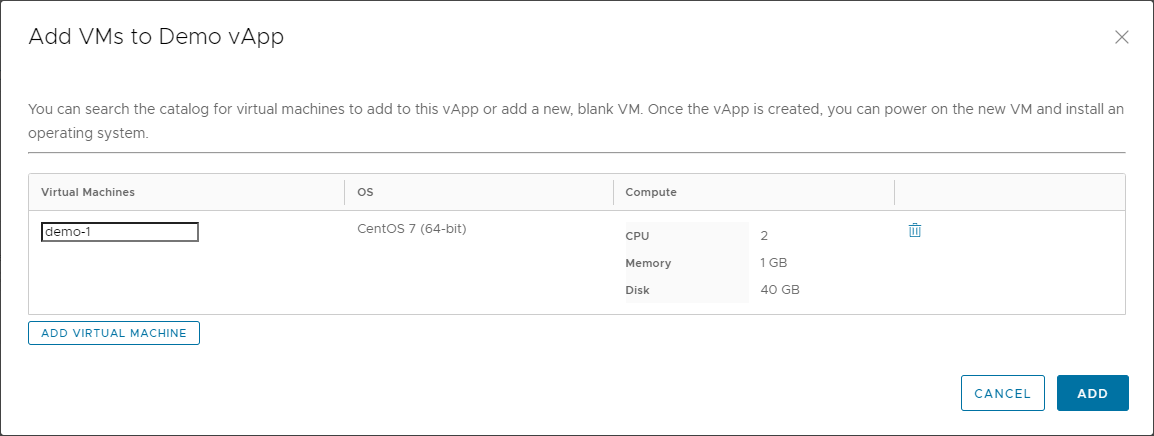
When creating a new vApp, as mentioned before, there is an option to create one or more virtual machines by clicking the add virtual machine button. The process for creating a virtual machine in an existing vApp can call be initiated through the Actions menu of the vApp and choosing the Add → Add VM option. This opens a new windows, as shown in the next image, there the user needs to input the name of the virtual machine and a computer name to be used in the operating system of the virtual machine.
By choosing the From Template option in the process, the user is provided a list of virtual machine templates which are published in the neoCloud catalog or user created virtual machine templates. These templates are typically preinstalled with an operating system and application (for example a database engine) and with predefined settings.
In the process the user may choose a different storage policy that the default one and configure the network parameters of the virtual machine
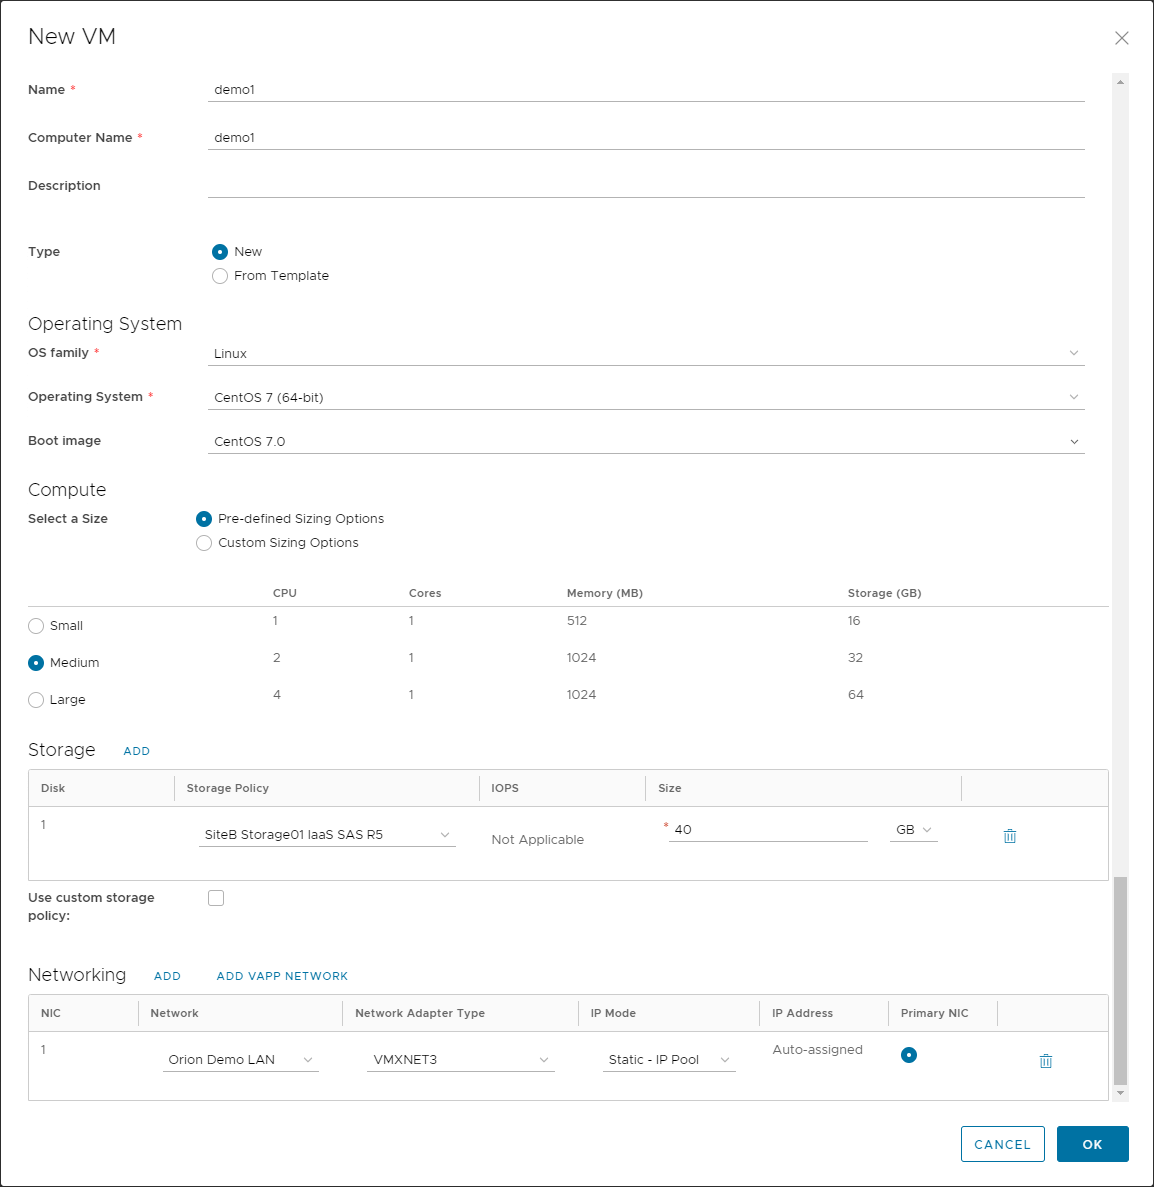
Users are also allowed to create virtual machines from scratch in which they would install an operating system which is not available in the templates published by neoCloud. In this process, beside the name, the user needs to provide additional parameters for the virtual machine, such as: operating system to be installed and a boot image (ISO image found in the neoCloud or customer's catalog), processor and memory size, one of more disks and a network where the virtual machine would be connected. This process is shown in the next image.
After finishing the process of creating a virtual machine and clicking the add button in the add virtual machine window, the virtual machine is being created. If the virtual machine is created from a template, this window will remain active until the virtual machine is cloned from the template.
The process of creating an standalone virtual machine is initiated by opening the Virtual Machines view from the left menu and by clicking the New VM button. This opens the same wizard as for creating a virtual machine in a vApp, but this time the virtual machine will not be added to a new or an existing vApp. Standalone virtual machines is a simpler option for smaller virtual data centers with few virtual machines, networks and administrators.
Managing a virtual machine
Managing virtual machines is performed in the Virtual Machines view, where all virtual machines are shown - no matter if they belong to a vApp or are standalone. The virtual machine tile shows a lot of useful status information and assigned resources to the virtual machine. As in the vApp, the tile has additional capabilities such as starting a console or detailed information regarding Storage and Networks.
The Actions menu of a virtual machine holds the basic tasks that can be performed on a virtual machine such as power on and off, the option to install VMware Tools and upgrade the virtual machine hardware, copying and moving a virtual machine, creating and reverting a snapshot or starting the Web Console or VM Remote Console (a dedicated remote control application which is installed on the user's computer).
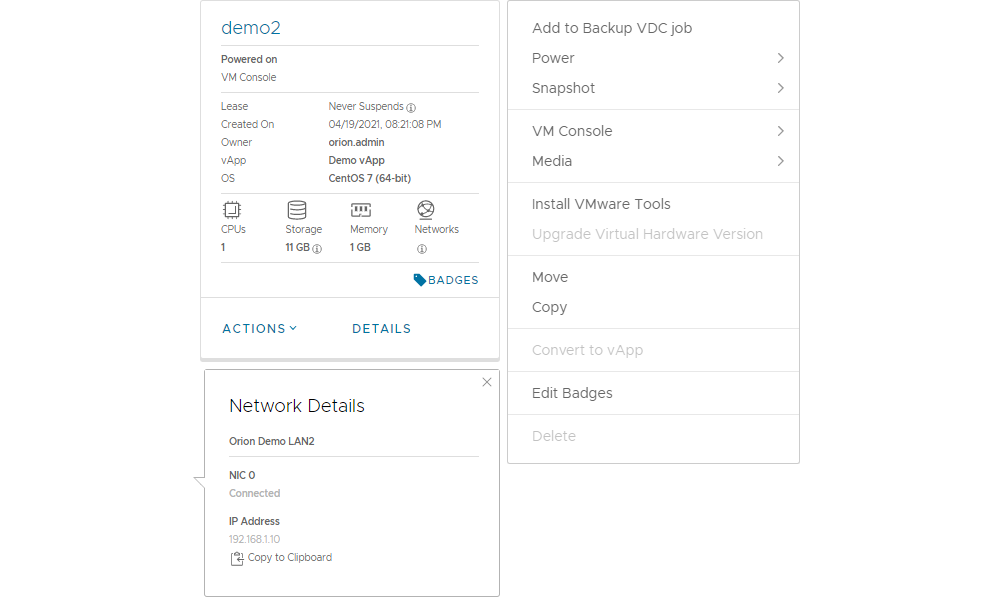
Detailed virtual machine management options can be accessed by clicking the Details button, which opens a new window divided in several sections.
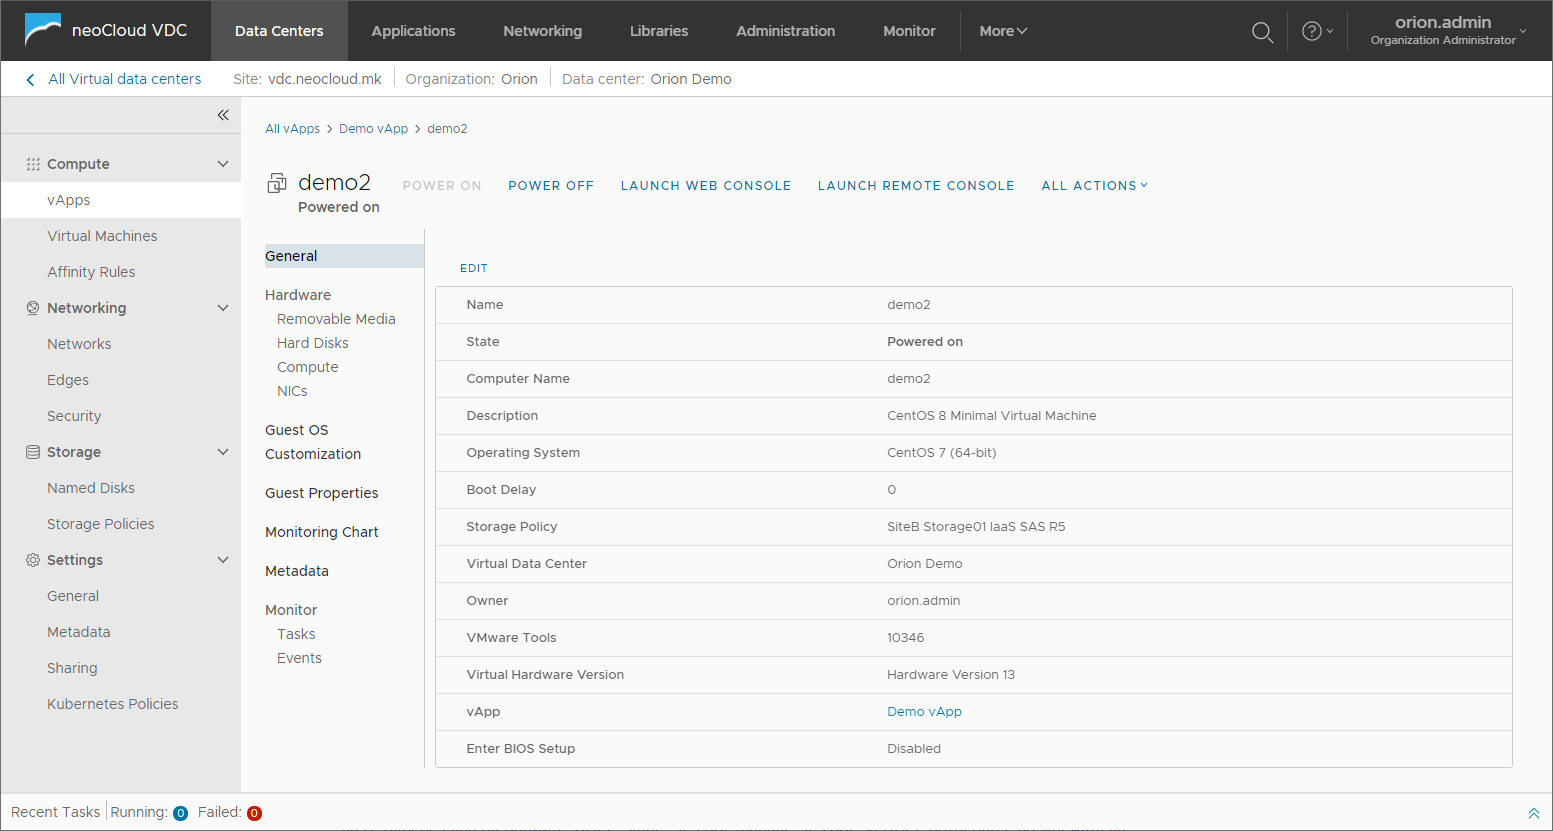
The General section shows the general parameters as name, operating system, storage policy of the virtual machine and BIOS, VMware Tools and hardware version options.
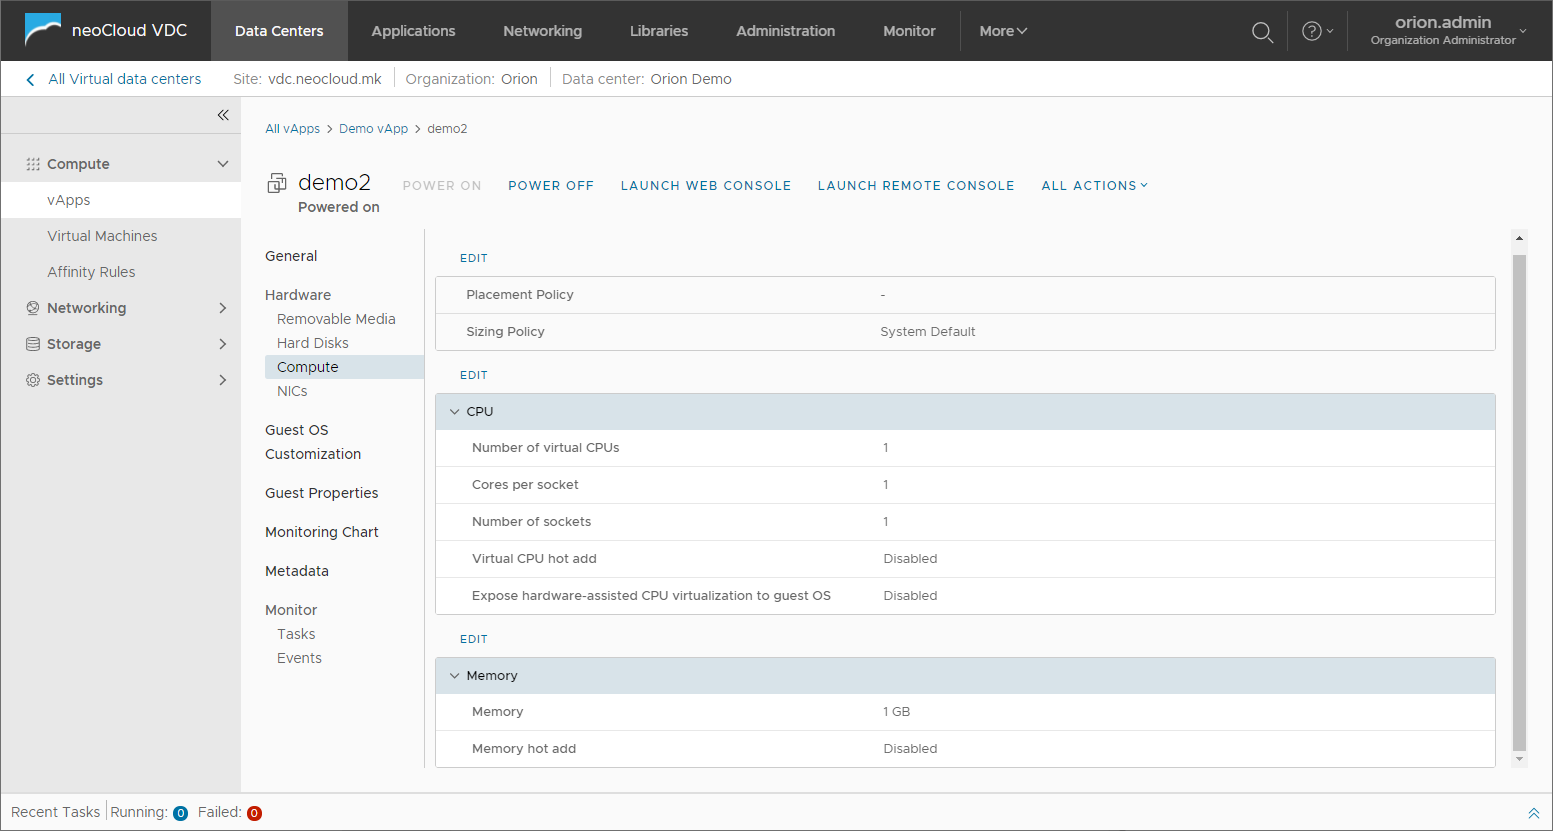
The Hardware is divided into few sub-section: Removable Media, Hard Disks, Compute and NICs. These section shows and allows of management of virtual machine resources - processor, memory, disk and network.
In Removable Media, the interface shows if media is connected in the CD/DVD Drive and Floppy Drive.
In Compute, the user manages with processor and memory resources of the virtual machine. At the processor fields the user can define the number of cores and core per processor the virtual machine will be assigned, which calculates the number of processors will be assigned. The virtual machine memory amount is defined in MB and the value can be typed in the field instead of using the up/down arrows. The Virtual CPU hot add and Memory hot add option enables adding CPU and memory while the virtual machine is running, but note that reducing the resources is only possible when the virtual machine is powered off.
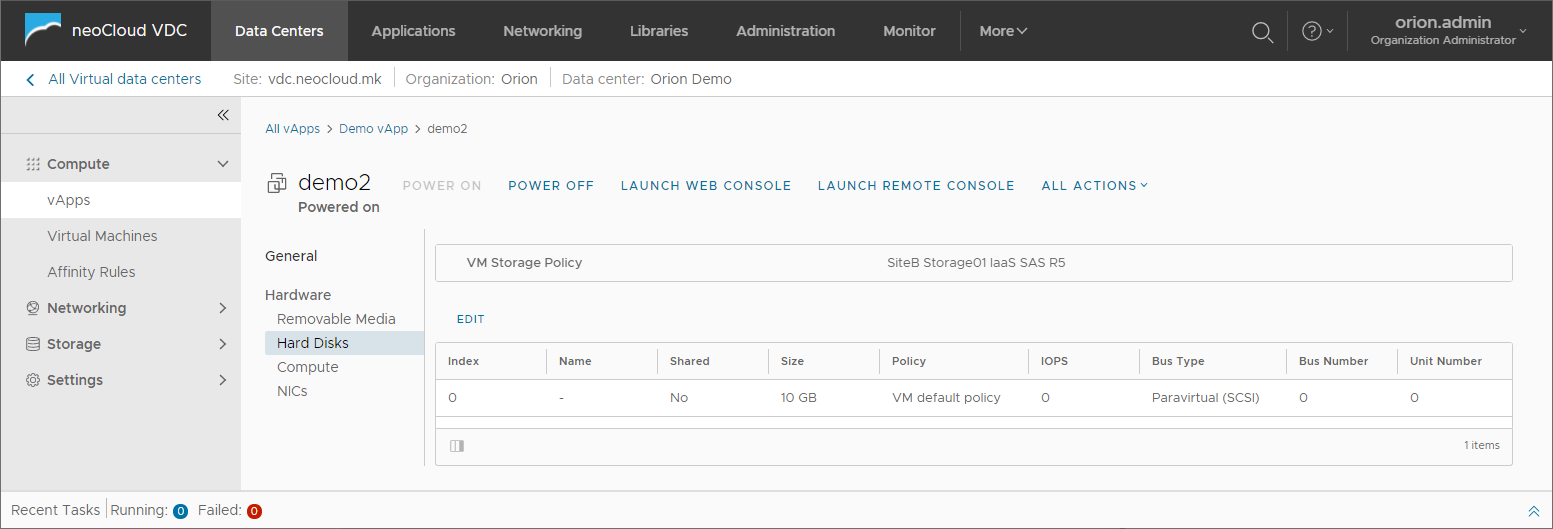
All virtual machine disks are shown in Hard Disks along with their parameters.
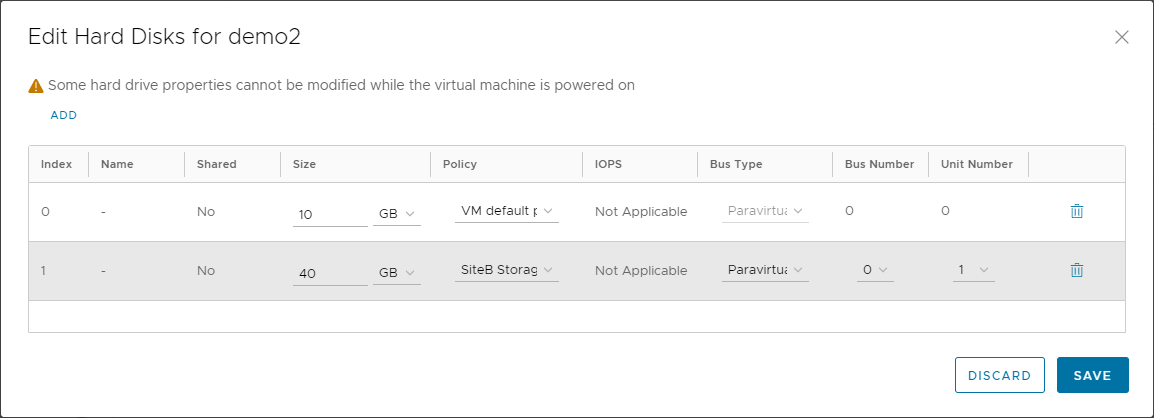
When adding a new disk, the size is also expressed in MB or GB and the value should be typed in the field. Bus Type, Bus Number and Unit Number are automatically filled with the next number of the list, but the user may change these parameters if needed. Each controller supports 4 disks, so for Bus Number 0 the used can add a disk on Unit Number 0 to 3. If more disks are required, the next Bus Number needs to be chosen (Bus Number 1) followed by the Unit Number 0 to 3. The added disk in the next image is grayed our.
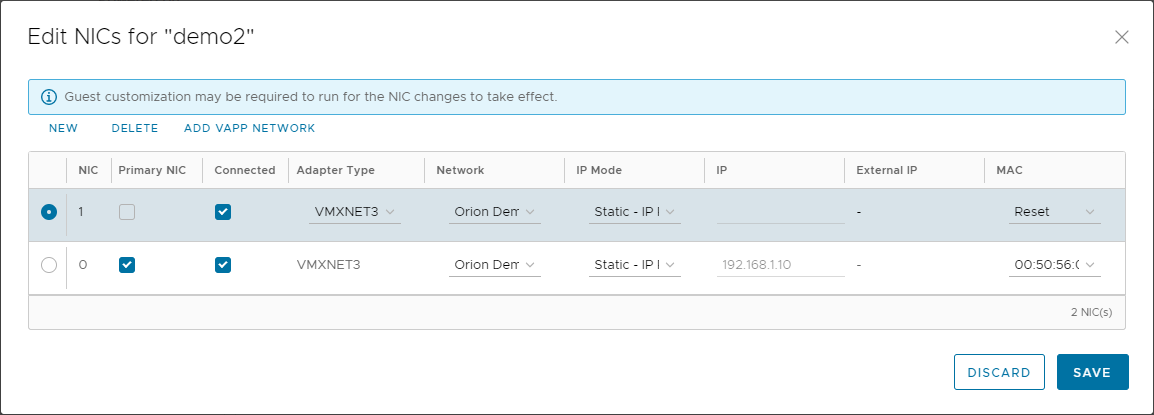
In NICs, all configured network adapters on the virtual machine are shown with their parameters.

When adding a new adapter, if the virtual machine is in a vApp, the network needs to be added in the vApp in oder to be available for use by the virtual machine in the network adapters part of the section. With IP Mode, the user may choose one of the following options: DHCP, Static - IP Pool and Manual - IP Pool. In order to use DHCP, there needs to be a DHCP server defined in the network which runs on a virtual machine or on the Edge Gateway. The Static - IP Pool option allows for automatic assignment of a static IP address in the virtual machine operating system from a previously defined IP pool in the network. Manual - IP Pool option allows for manual assignment of a static IP address in the operating system. The added adapter in the next image is grayed out.
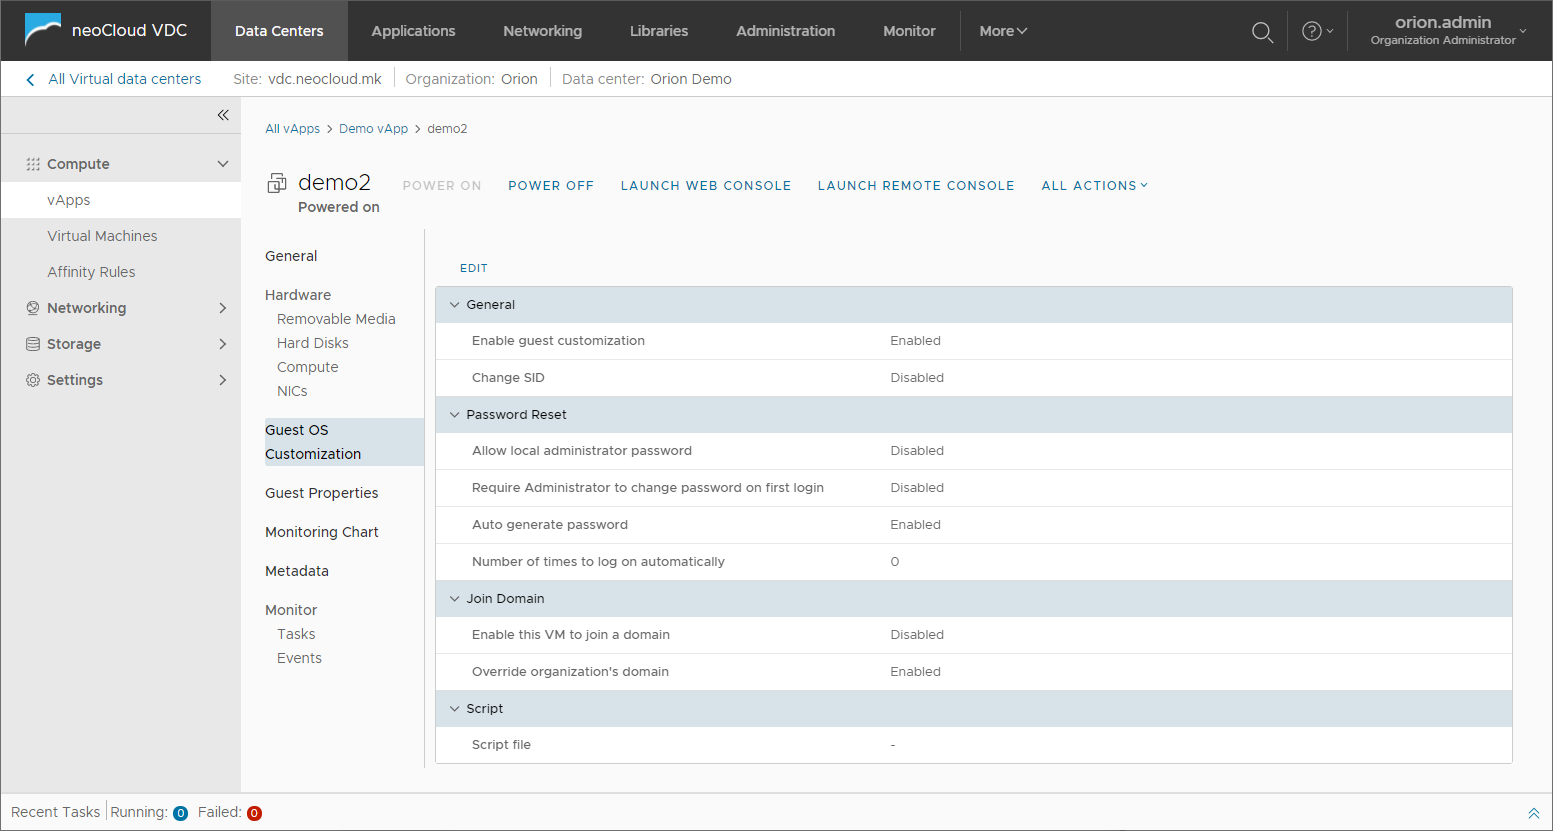
In the Guest OS Customization section are the options for customizing the operating system of the virtual machine when it is first powered on after the creation. This function applies the name and IP address in the operating system, but can also be used for setting a predefined administrator password, joining the virtual machine to a domain or executing a script.
In the Monitoring Chart section, the user can view different graphic charts for the utilization of resources of the virtual machine, such as CPU, memory, disk and network in intervals from half an hour up to a week.
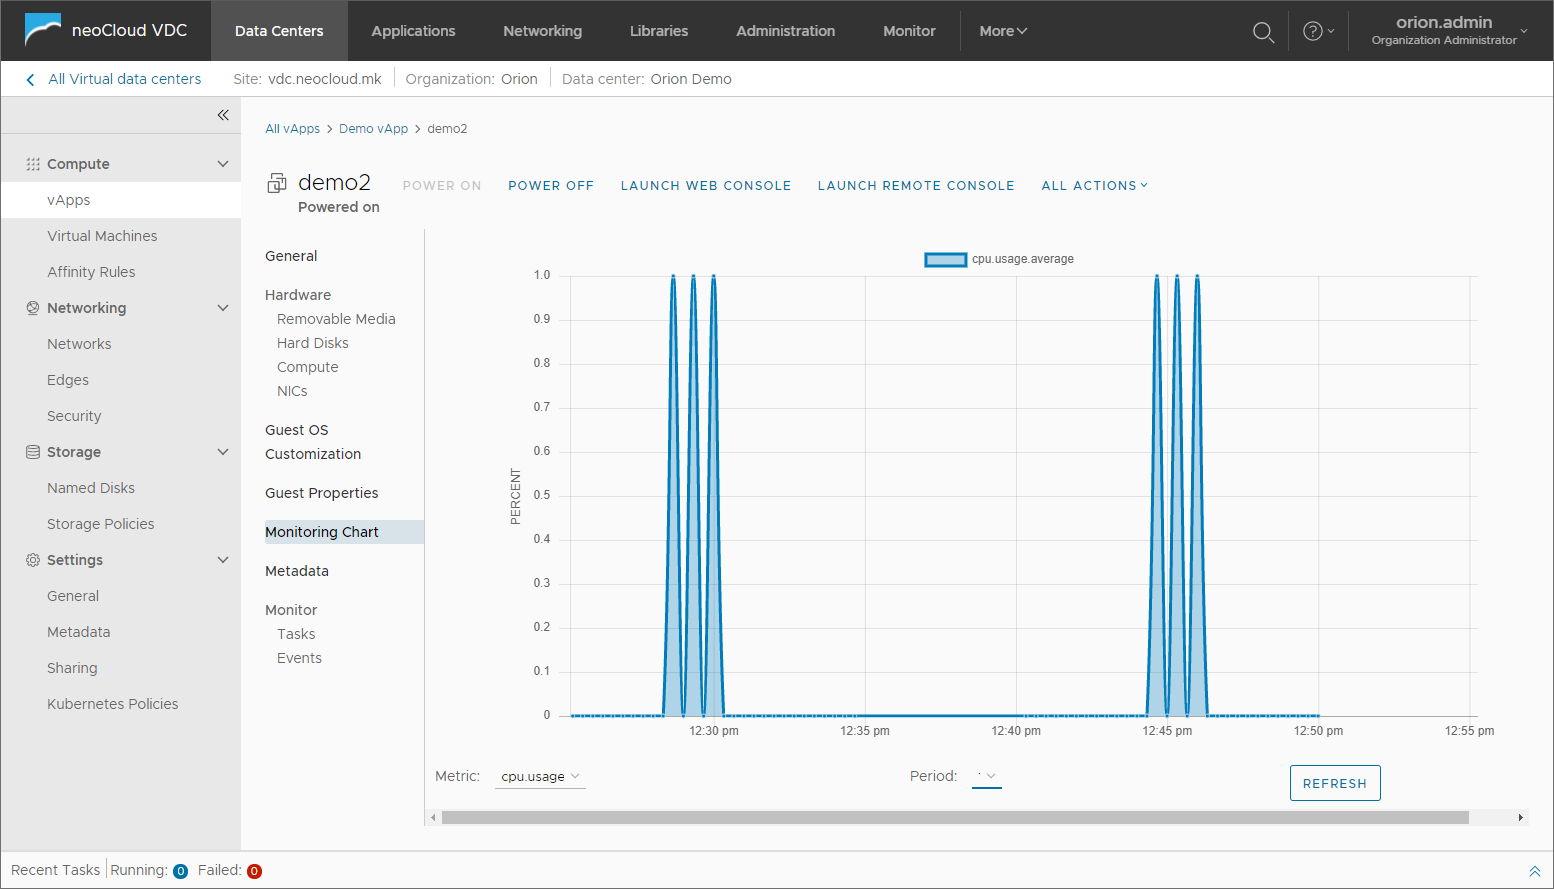
The Monitor section contain the Tasks и Events views where the users can preview the tasks and events related to the virtual machine. In these views there an export option in a CSV file.
Affinity Rules
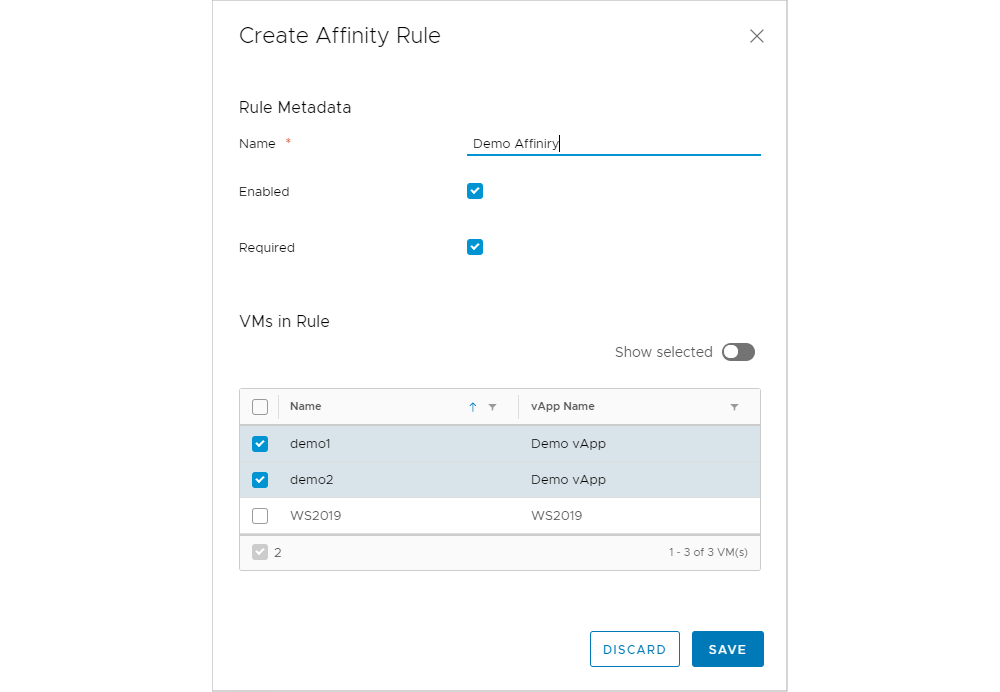
Affinity rules define if two or more virtual machines should run on one physical server (Affinity Rule) or in a different physical server (Anti-Affinity Rule) of the neoCloud infrastructure. With these rules, the user can define if some virtual machines that are part of an application which need lowest latency and highest network bandwidth to run on one server, or on the other hand if the virtual machines have the same role (for example web server behind a Load Balancer) will run on different servers for maximal availability of the application.
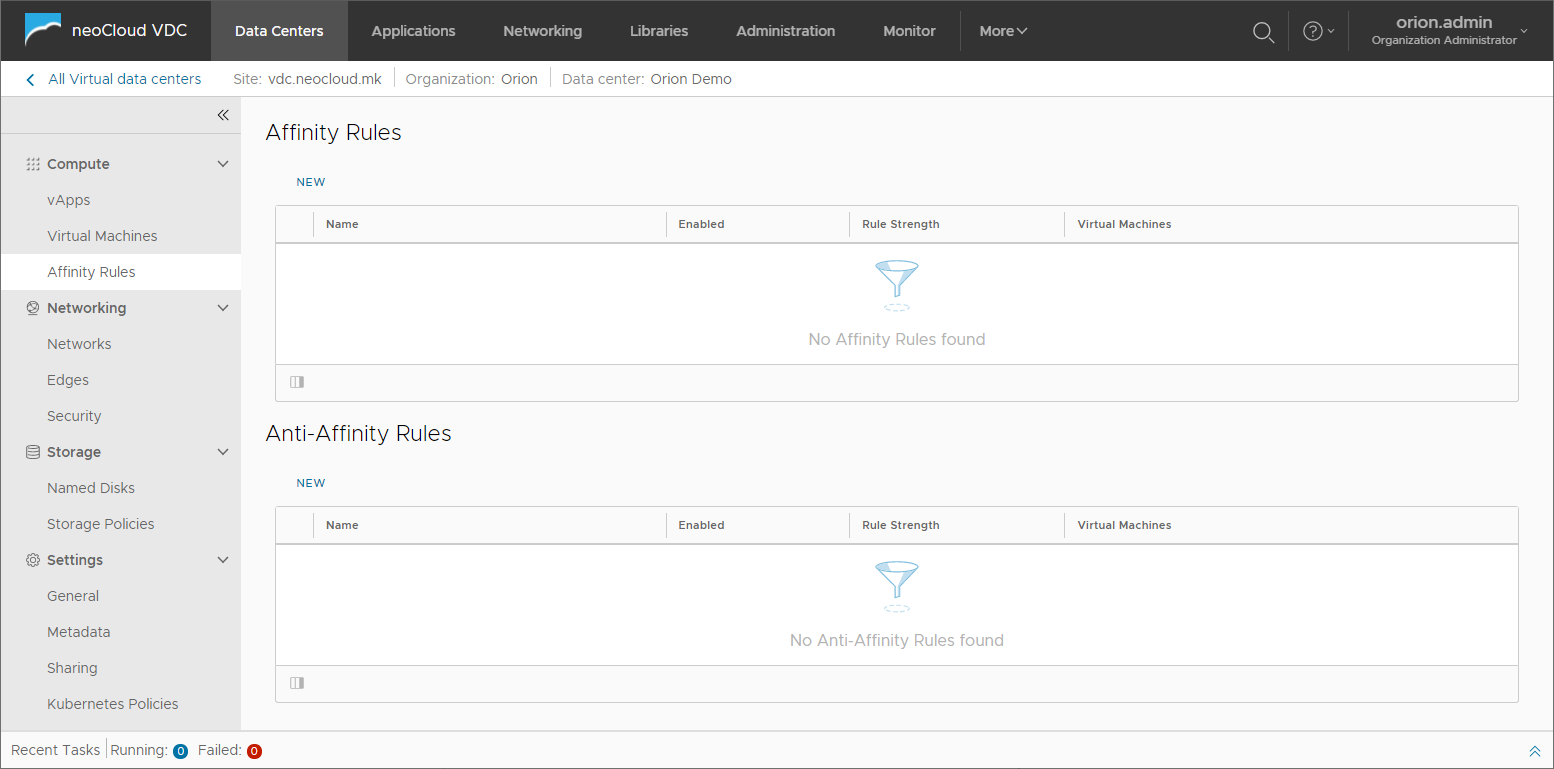
When creating these rules it is sufficient to set the name of the rule and select the virtual machines. The rules can be enabled or disabled and the option Required defines if it is allowed the rule to be overridden in case there is a conflict with other rules or conflict related to the neoCloud infrastructure.
