Managing a SoftEther VPN Server Using the SoftEther VPN Server Manager
Downloading and Installing the SoftEther VPN Server Manager
The SoftEther VPN Server Manager can be downloaded from the official webpage for downloading SoftEther:
Alternatively, the latest version of the Server Manager for Windows can be downloaded directly from the following link:
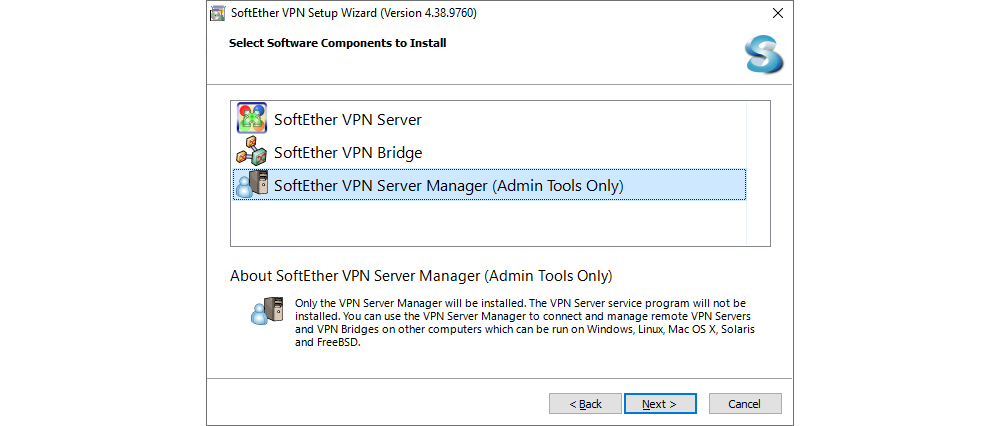
The downloaded software contains the SoftEther VPN Server, SoftEther VPN Bridge, and SoftEther VPN Server Manager. The installation process itself is very similar to the one for a SoftEther VPN Client for Windows. When choosing which software to install, select SoftEther VPN Server Manager (Admin Tools only).
Necessary Firewall and NAT Rules in VDC
For the SoftEther VPN server to be able to receive connections from a VPN client and the VPN Server Manager, it is required to publish all necessary ports. Depending on the type of VPN connection to be used, SoftEther VPN Client and/or L2TP over IPSec, the published ports are different. When using SoftEther VPN clients it is necessary to publish TCP port 443 (HTTPS communication), while UDP ports 500 and 4500 are necessary when using L2TP over IPSec.
TCP port 443 is often used for publishing web servers, so it is possible to change the public port compared to the private port when publishing the SoftEther VPN server (port forwarding). For example, SoftEther VPN server may be published on the internet on TCP port 8443, which will then be forwarded as port 443 on the server itself.
In the given example below, the Firewall rules define allowing TCP port 8443 and UDP ports 500 and 4500 on the public IP address.

The DNAT rules forward the publicly published TCP port 8443 to TCP port 443 on the SoftEther VPN Server virtual machine, while the publicly published UDP ports 500 and 4500 are forwarded without any change.

On the model of these rules, it is possible to set Firewall and NAT rules for an SSH connection to the SoftEther VPN Server virtual machine, where rather than enabling port 22, NAT can be performed on another port, such as 8222.
Connecting to the SoftEther VPN Server
Once the SoftEther VPN Server Manager has been installed and launched, a connection to the SoftEther VPN server needs to be established and added to the Server Manager, from where it can then be managed.
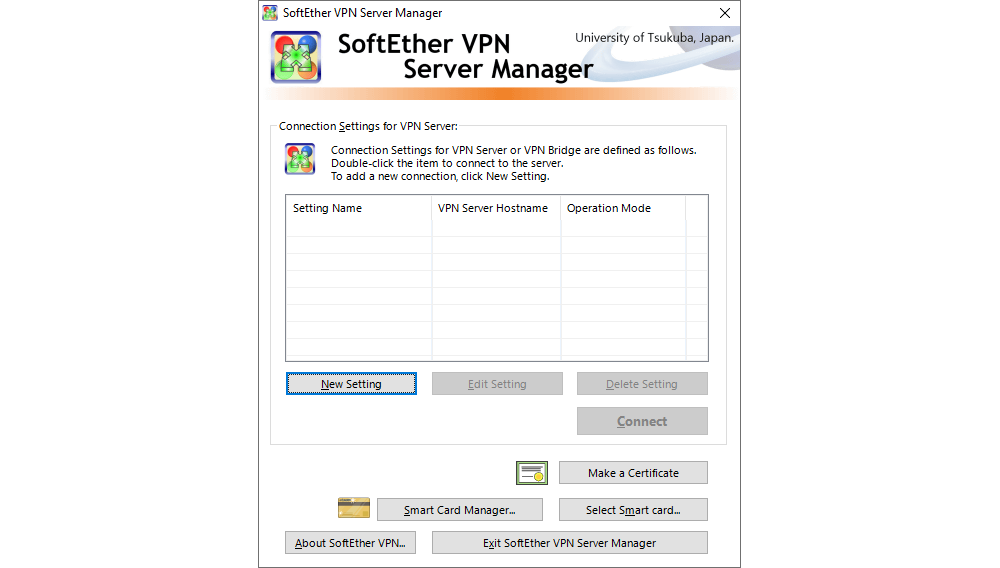
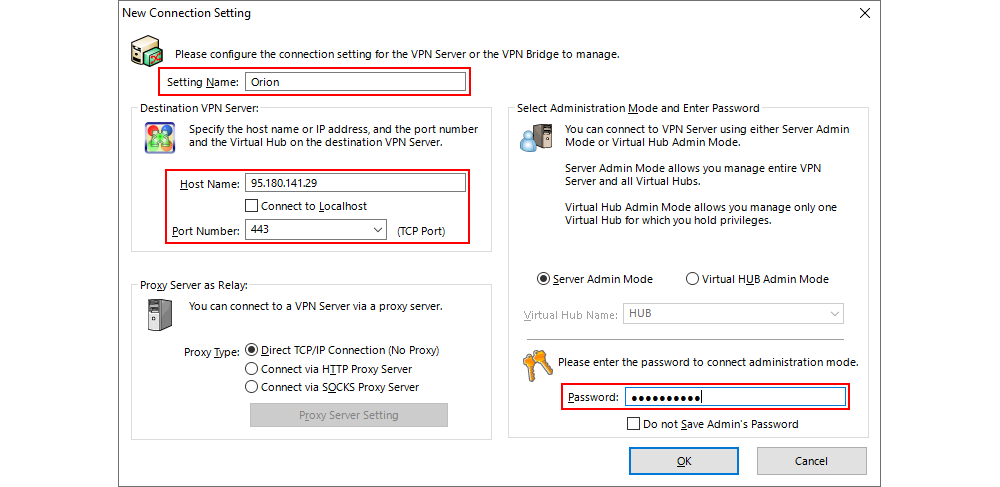
Clicking on New Settings opens up a new window where a few necessary parameters for the SoftEther VPN server need to be entered:
- Setting Name: Name of the connection, i.e. of the SoftEther VPN server, for easier recognition in case multiple servers are to be managed.
- Host Name: Name or IP address of the VPN server.
- Port Number: Port on which the connection to the VPN server is established.
- Password: Password for logging into the VPN server.
Default password: se.P@ssw0rd
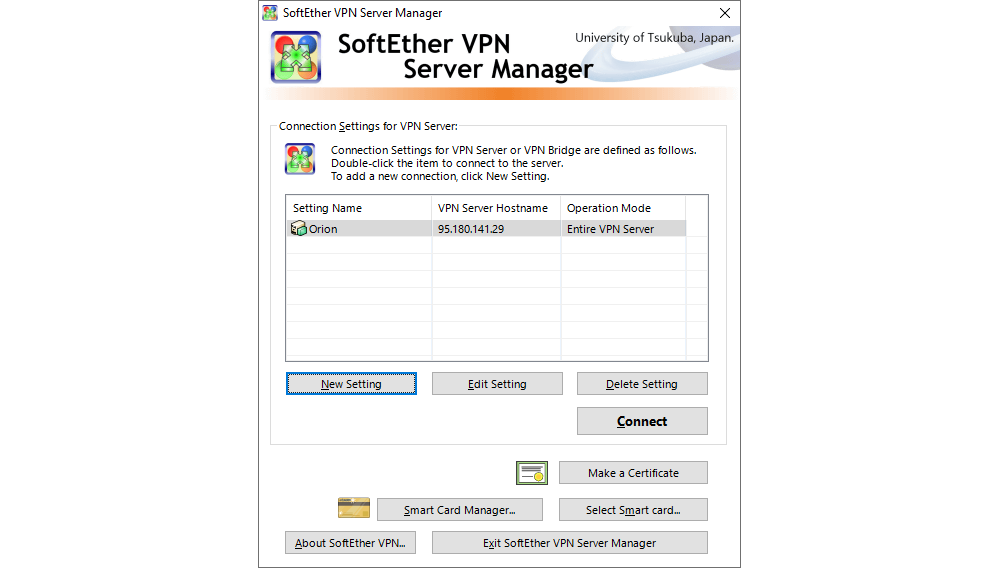
Once the process of adding the server is completed, the start screen of the interface displays the created connection. By clicking on Connect, a connection is established for managing the SoftEther VPN server.
Managing the SoftEther VPN Server
All the parameters of the SoftEther VPN server can be managed through the SoftEther VPN Server Manager, which is why the interface offers such a large number of options. In this manual, we present the basic configuration and management possibilities for establishing a VPN connection through clients for Windows and Linux.
In the start screen for managing the VPN server, the user can manage virtual hubs, view the status of the server or a virtual hub, display active connections to the server etc.
⚠️Note: After providing a new SoftEther VPN Server, the first task to be carried out in the initial configuration is changing the administrator password of the VPN server itself. This step is performed through the SoftEther VPN Server Manager, where after logging into the server, the user needs to click on Encryption and Network. In the subsequently displayed window, there is a Change Admin Password button where the new password needs to be entered.
The SoftEther VPN server allows for the configuration of multiple Virtual Hubs, each being characterized by a separate Layer-2 network segment and isolation in the network communication, user profiles, certificates, and other parameters. In the template, a single virtual hub is configured, but system administrators can define more if need be.
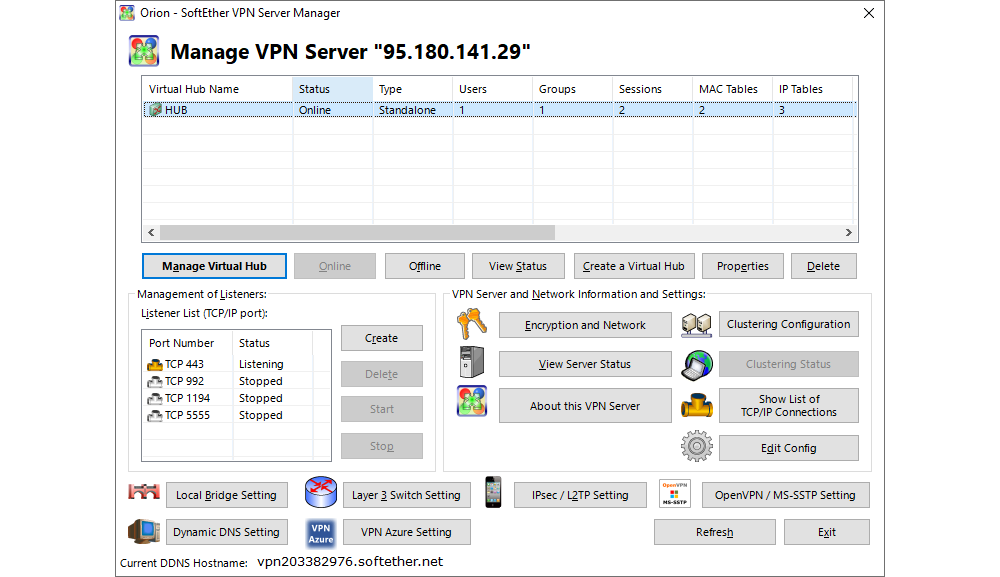
Once a virtual hub is selected, clicking on Manage Virtual Hub opens a new window which displays the hub’s status as well as options for managing user profiles and groups, Virtual NAT and Virtual DHCP Server, and other options.
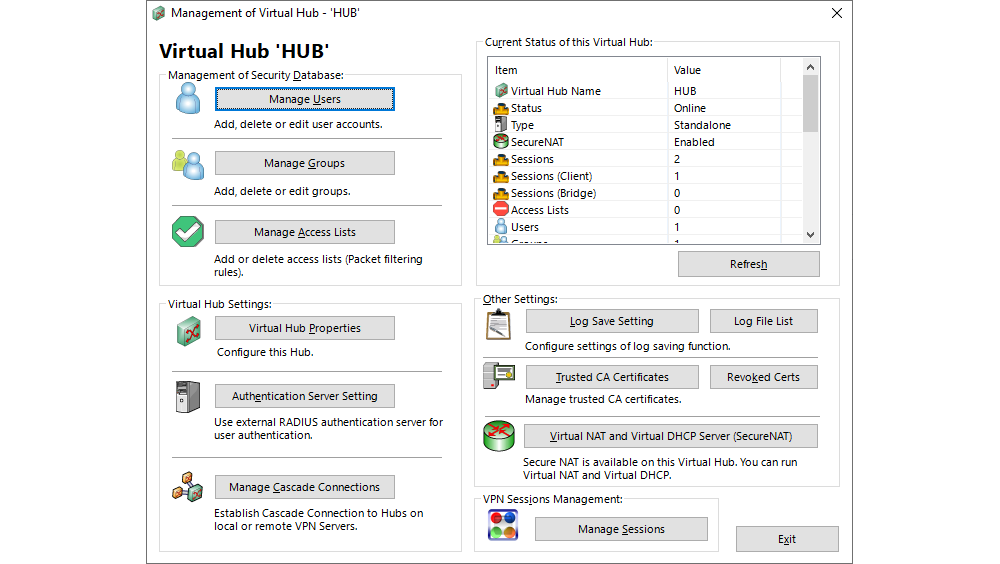
Clicking on Manage Users opens a new window where a list of all the configured user profiles is displayed and where new user profiles can be created, whereas existing user profiles can be deleted or altered.

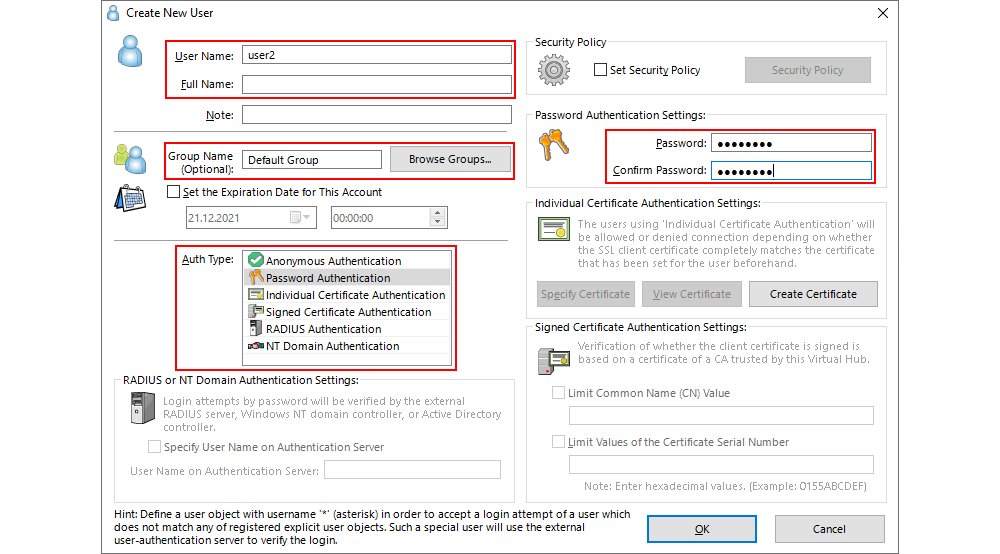
When creating a new user, clicking on New opens a new window where the following basic parameters pertaining to the new user profile need to be entered:
- User Name: A short name used for logging into the VPN server through the VPN client.
- Full Name: An optional field where the full name and surname of the user can be entered.
- Group Name An optional field where one of the existing user groups can be selected.
- Auth Type: A field where Password Authentication should be selected (as is the case by default).
- Password: A password for the user profile which will serve to log into the VPN server through the VPN client. It is possible to change the password through the VPN client.
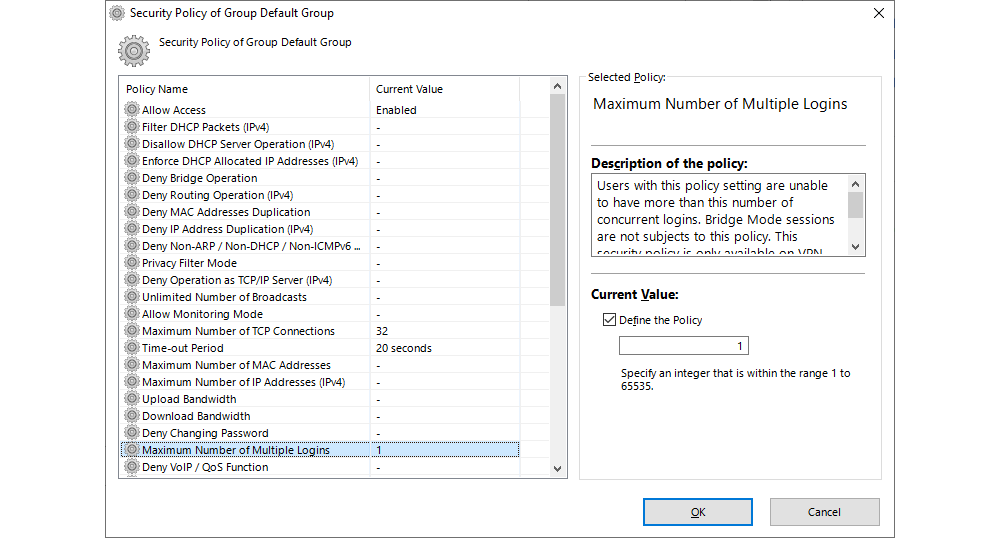
Additionally, if a specific security policy needs to be set for the user profile, this can be done by ticking Set Security Policy and altering the current policy. The parameters of the security policies can be used to manage a user’s bandwidth, number of connections, simultaneously active sessions, and a great deal of other options.
Clicking Manage Groups in the Virtual Hub interface opens a new window where a list of all the configured user groups is displayed and where new groups can be created, whereas existing user groups can be deleted or altered.

Groups facilitate the management of user profiles’ security policies, dispensing with the need to define a policy for each user individually. Security policies can be used to manage a user’s bandwidth, number of connections, simultaneously active sessions, and a great deal of other options.
One of the most important aspects of configuring the SoftEther VPN server is Virtual NAT and Virtual DHCP (SecureNAT). This part of the configuration enables network communication for the VPN clients through the VPN connection to the systems which are hosted on the virtual data centre in neoCloud.
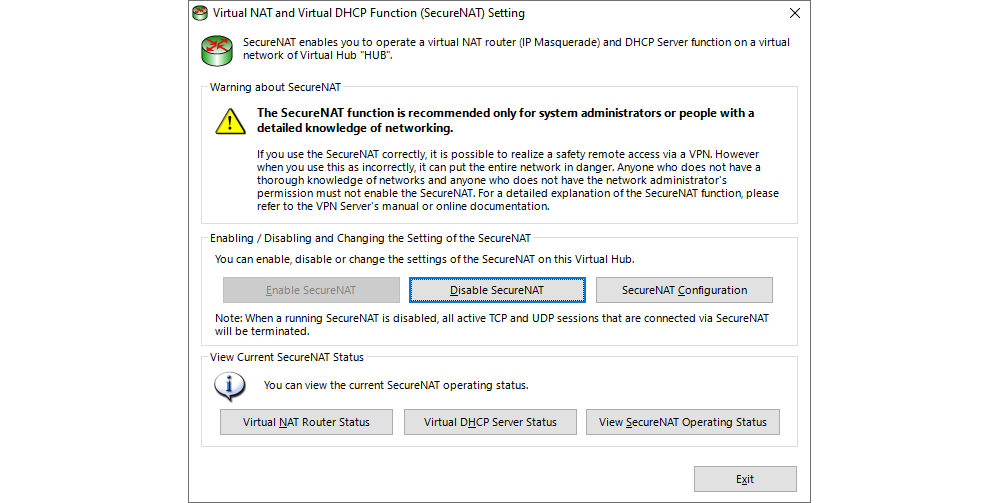
When the VPN clients establish communication with the VPN server, the user’s network adapter obtains an IP address from the virtual DHCP server in the VPN server. When the VPN clients communicate with systems within the networks where the VPN server is set up, the communication takes place through SecureNAT, i.e. the entire network communication is translated using the IP address of the VPN server in the network in which the latter is set up. That way, there is no need for additional firewall rules at the edge of the virtual data centre for the DHCP addresses which the VPN clients obtain.
The addresses in the virtual DHCP server which are defined in the SoftEther VPN template are rarely used in private networks; consequently, most users will have no need to change these parameters. In the default configuration, no addresses are set up for Default Gateway and DNS servers, but they can be set up if the need arises. These parameters might be needed if the entire network communication is to take place through the VPN server, if there is a DNS/Active Directory infrastructure in the virtual data centre or a large number of networks, or in various other scenarios.
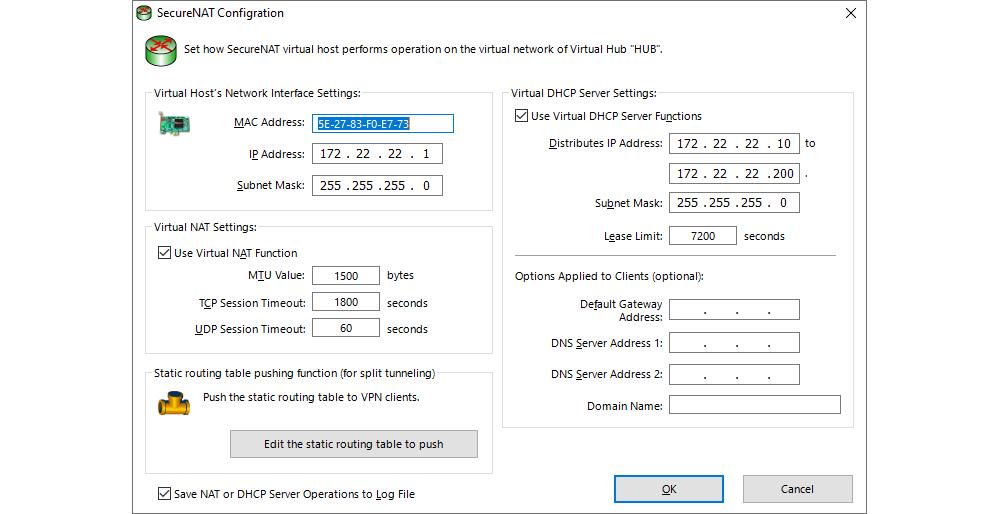
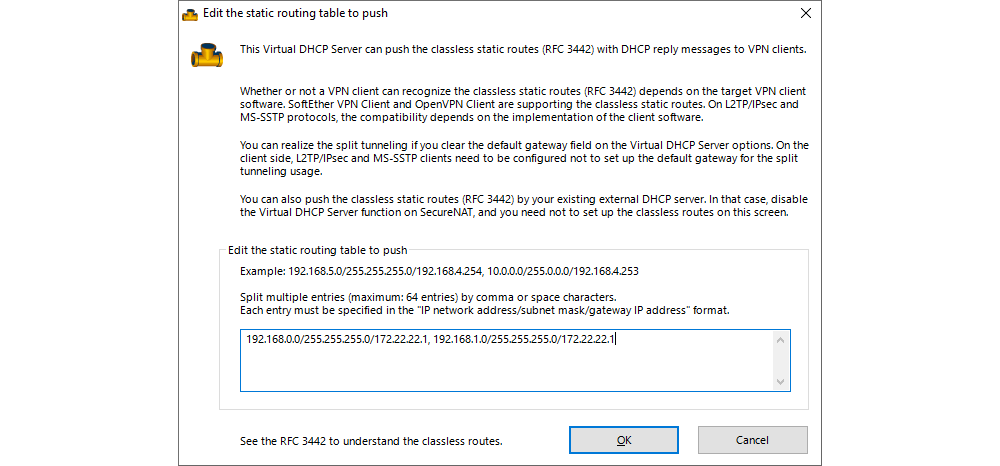
At this stage of the configuration, there are specific parameters which need to be set and which differ depending on the network configuration in the virtual data centre. For each network in the virtual data centre, a static route needs to be defined which will be propagated to the VPN clients.
The following example shows two static routes propagated to VPN clients in a scenario where the user’s virtual data centre has two networks, 192.168.0.0/24 and 192.168.1.0/24.
192.168.0.0/255.255.255.0/172.22.22.1, 192.168.1.0/255.255.255.0/172.22.22.1
In this example, 192.168.0.0 and 192.168.1.0 represent networks in the virtual data centre with a subnet mask 255.255.255.0, whereas 172.22.22.1 is a virtual IP address in the VPN server through which communication with the networks is achieved.
Upgrading the SoftEther VPN Server
The SoftEther VPN server can be upgraded through a terminal session in the operating system in which the software has been installed. To this end, a SSH session with the server is necessary.
Before downloading the software, a suitable directory needs to be chosen. It is recommendable for the software to be installed in the Home directory. Subsequently, it can be transferred to a suitable directory with one of the commands presented below.
The SoftEther VPN server is installed at /usr/local in a directory where the version is indicated, for example vpnserver-4.38. In this directory, a symbolic link (symlink or soft link) has been set up in the vpnserver directory, from where the VPN server service is subsequently started. The upgrade process is designed in such a way as to dispense with the need for a complete replacement of the vpnserver directory, allowing instead for the setup of the new version in a new directory, whereafter the necessary configuration files can be copied and the symlink directory can be replaced at the new path. This makes the upgrade process quick and simple.
The latest version of the SoftEther VPN Server can be downloaded not only from the download page given at the start of this page, but also using the following command:
wget https://www.softether-download.com/files/softether/v4.38-9760-rtm-2021.08.17-tree/Linux/SoftEther_VPN_Server/64bit_-_Intel_x64_or_AMD64/softether-vpnserver-v4.38-9760-rtm-2021.08.17-linux-x64-64bit.tar.gz
To decompress the compressed file, use the following command:
sudo tar xzf softether-vpnserver-v4.38-9760-rtm-2021.08.17-linux-x64-64bit.tar.gz
To change the path in the directory containing the decompressed software, use the following command:
cd vpnclient
To build from the source code, use the following command:
sudo make
To return to the previous directory and move the software to /usr/local, use the following commands
cd ..
mv vpnserver/ /usr/local/vpnserver-<v_new>
To change privileges and enable the execution of "vpncmd" and "vpnserver", use the following commands:
cd /usr/local/vpnserver-<v_new>
chmod 600 *
chmod 700 vpncmd
chmod 700 vpnserver
ls -l
The files named "hamcore.se2" and "vpn_server.conf" need to be copied from the path of the current version of the VPN server and pasted at the path of the new version, using the following commands:
cp /usr/local/vpnserver-<v_old>/hamcore.se2 /usr/local/vpnserver-<v_new>/
cp /usr/local/vpnserver-<v_old>/vpn_server.config /usr/local/vpnserver-<v_new>/
At this stage, the VPN server service needs to be stopped, so that the replacement can be performed:
systemctl stop vpnserver
To replace a symlink, use the following command:
ln -sfn vpnserver-<v-new>/ vpnserver
Finally, the service can be restarted using the following command:
systemctl start vpnserver
