Creating and Editing Backup Jobs
Initiating the process of creating and editing jobs
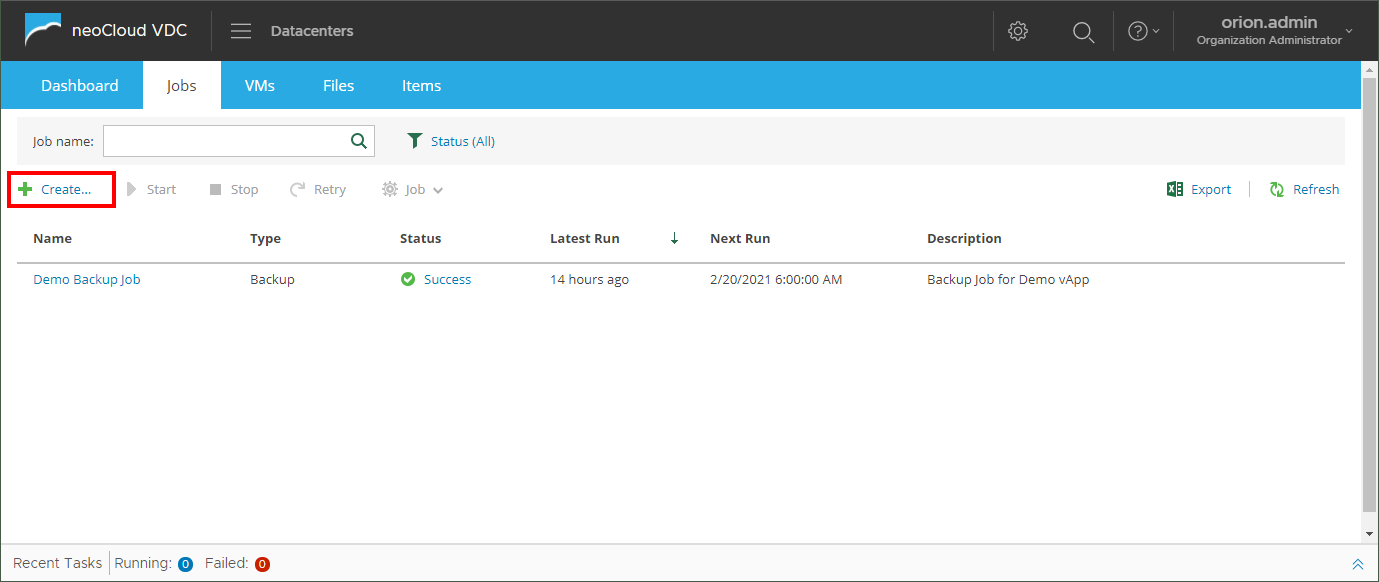
The process for creating a new backup job begins by clicking the Create button in the Jobs tab, as shown in the following image. Editing existing backup jobs in through an identical process as creating jobs, but started from the Edit option in the Job menu which becomes available once a job is selected.
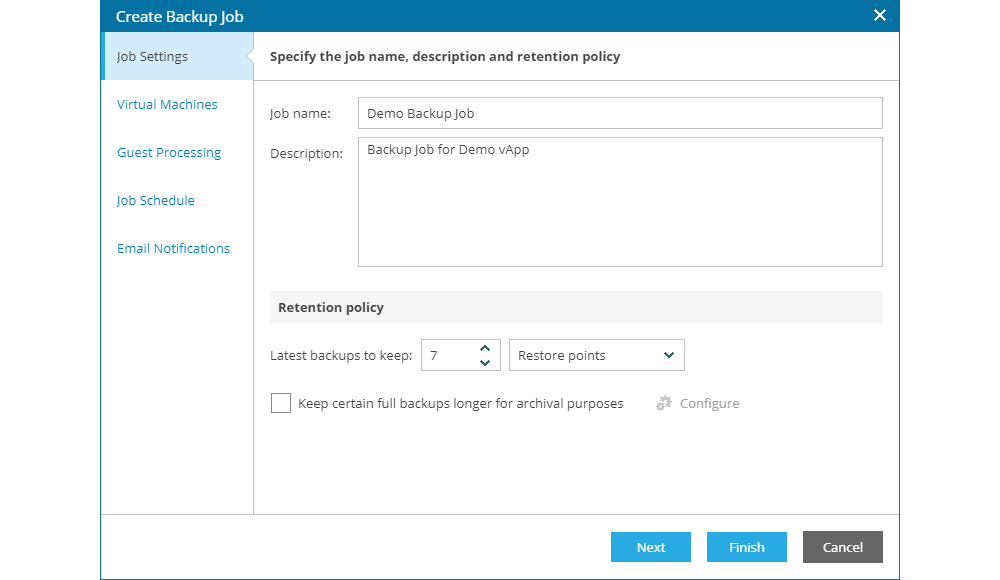
The first screen from the process is Job Settings where the user needs to enter basic job information, such as:
- Name of the backup job
- Description of the backup job
- Define retention policy
In the retention policy, the user needs to define the number of restore points or days for keeping the basic, incremental backup points. Optionally, if the customer need to keep additional full backups for archive purposes, the user can select the option Keep certain full backups longer for archival purposes.
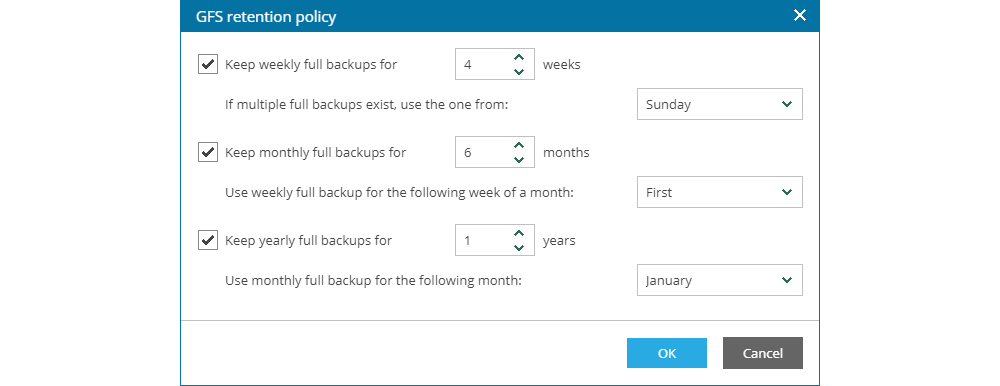
If this option is full backups is utilized, the user may define the retention period for:
- Weekly backups and in which day of the week to generate the weekly restore points
- Monthly backups and in which week of the month to generate the monthly restore points
- Yearly backups and in which month of the year to generate the yearly restore points
Adding objects to backup jobs
The next screen of the job creation process is adding objects that will be backed up. Objects which can be included in the backup job are the complete organization, virtual data centers, virtual applications (vApps) and virtual machines. By choosing an object, all objects which are in the hierarchy and included, in the following order: organization, virtual data center, virtual application, virtual machine. For example, if the user chooses a virtual data center in the backup job, all virtual application and their virtual machines are included in the backup. Except for virtual machine as the final instance in the hierarchy, vApp parameters are also saved when performing backup on a vApp (networks, privileges, start/stop orders etc.). In the example with the virtual data center, when creating a new virtual application with virtual machines in it, these objects will be automatically included in the backup job.
If editing an existing backup job, this screen will show the existing objects where the user can remove these objects form the job and change the order of execution. Also there is a possibility to exclude objects from the backup job, such as excluding a virtual application of a virtual machine that does not need backup.
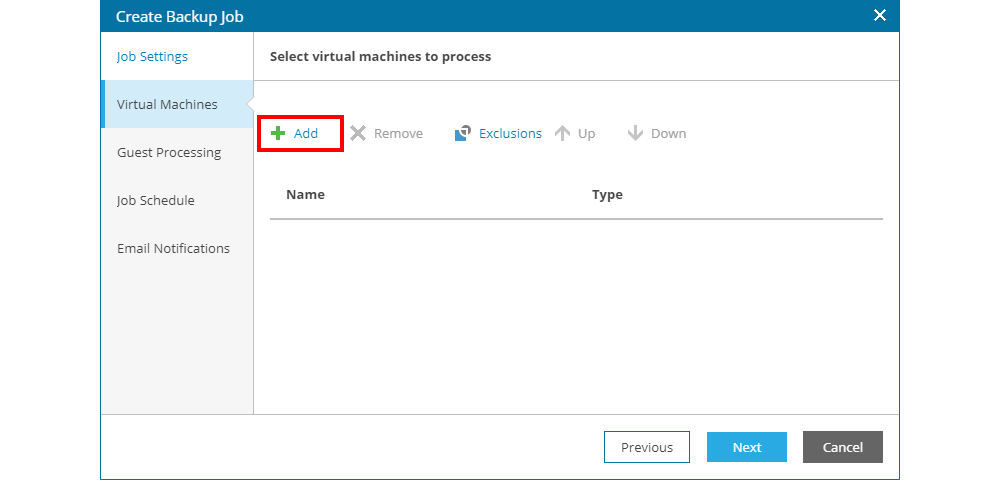
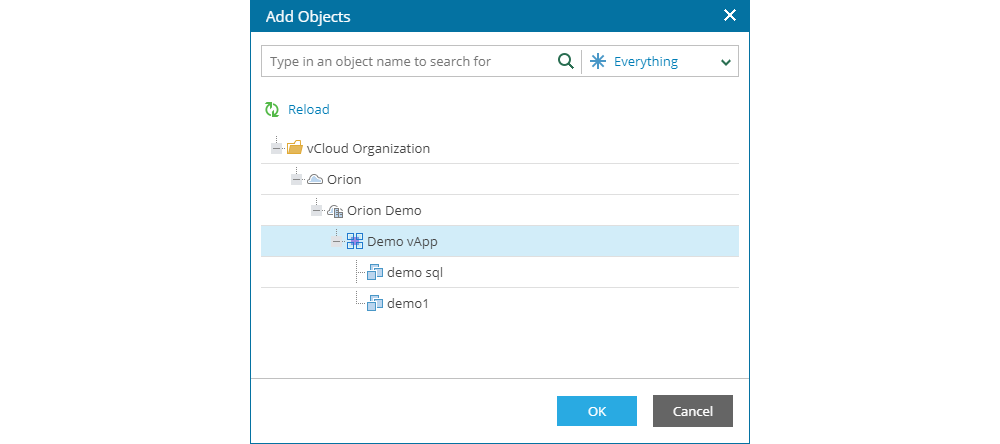
By clicking + Add from the previous image, a new windows is opened where the user can browse through all available virtual data centers, virtual application and virtual machines from the organization. Each object in the hierarchy below vCloud Organization can be selected in the job.
Advanced application integration (optional step)
If the user does not need Application-Aware Processing (AAP) or Guest File System Indexing, this step from the job configuration can be skipped.
Application-Aware Processing enables virtual machine application level integration, by processing the supported applications: Microsoft Active Directory, Microsoft Exchange, Microsoft SQL Server, Microsoft SharePoint and Oracle Database. For detailed information on supported applications and their version, users can browser though the official documentation of the backup software. Guest File System Indexing enables indexing of all data in the operating system of the virtual machine, an integration which is necessary for using the restore individual files and folders option.
In order for the application level or data indexing integration to work, it is necessary for the backup software to the able to access within the protected operating system and application. In the Backup VDC interface, the users are provided with the ability to add login credentials for the operating system and application within the job wizard, avoiding the need to provide access to the customer's system to neoCloud administrators. The credentials are stored in the encrypted database of the software, where neoCloud administrators don't have access, which guarantees the isolation of the customer's systems from the service provider.
Access to the operating system and applications is provided by defining the login credentials in the Credentials part of the screen.
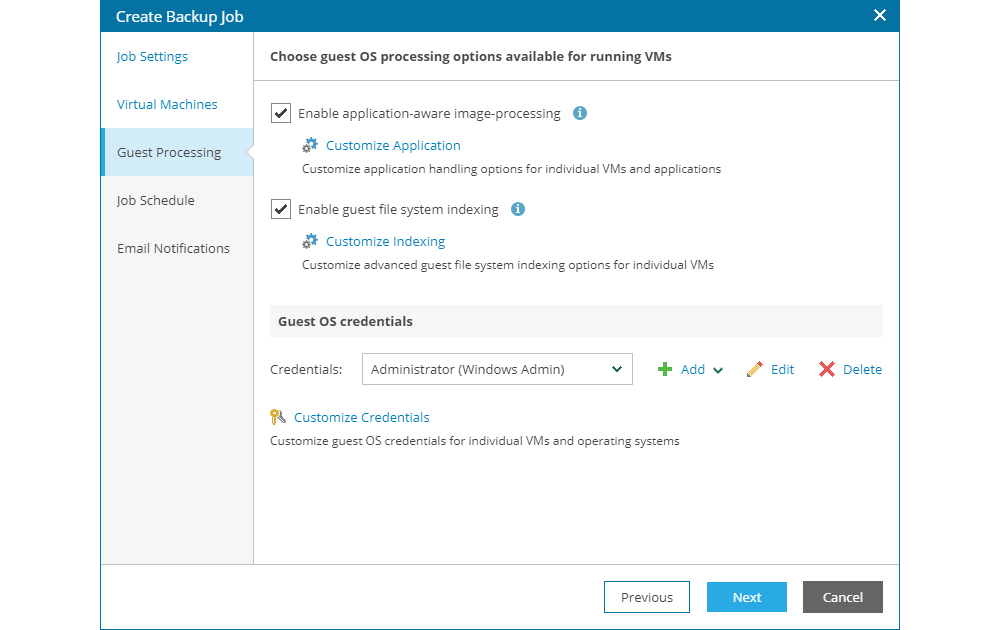
If the users enables the application level integration option , it is necessary to configure parameters which define the application processing for each virtual application or virtual machine in the backup job. First, it is necessary to add the virtual application and machines which will be processed on the application level by clicking Add VM... and then configuring specific application processing parameters by selecting the object and clicking the Edit, as shown in the next image.
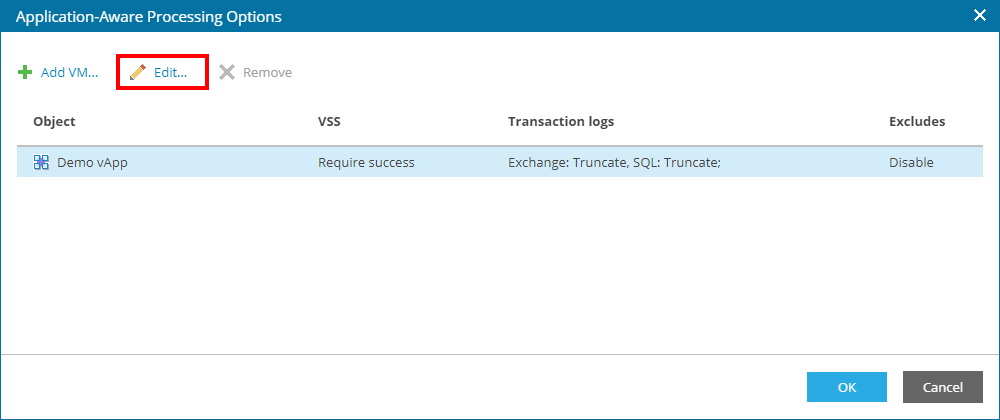
In the windows that opens, there are four tabs:
- General - general parameters for method of processing applications
- SQL - parameters for processing SQL database transaction logs
- Oracle - parameters for processing Oracle database archive logs
- File Exclusions - parameters for file and folder exclusion
If the virtual machines have Microsoft Active Directory and Microsoft Exchange applications installed, there is not need for defining parameters in the SQL and Oracle tabs. With SQL and Oracle applications it is necessary to configure the appropriate tab from the window.
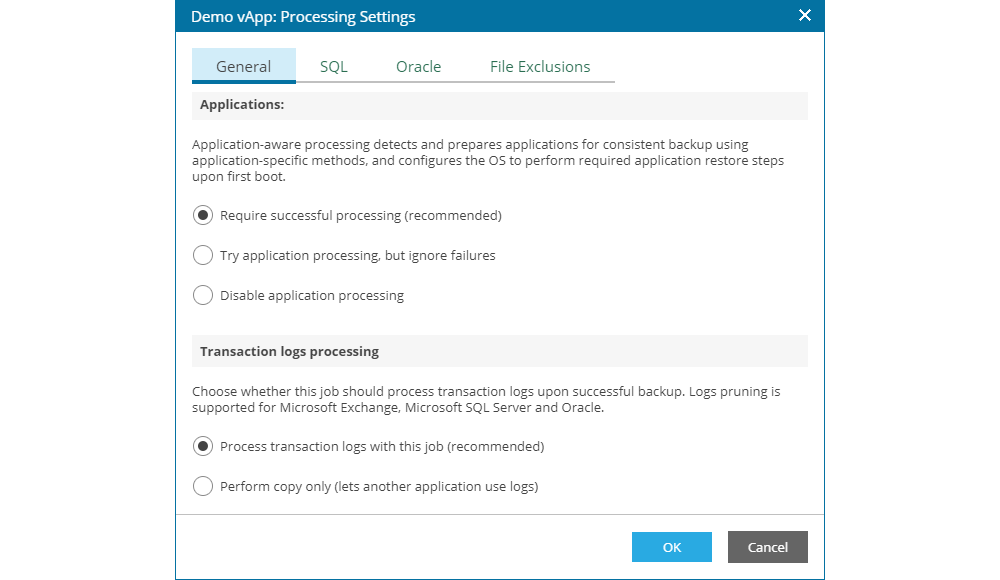
In the General, the user need to define the following parameters:
- If applications will be processed, if the job will try to process the application but proceed in case of an error or if successful application processing is required (predefined selection)
- If application transaction logs will be processed (predefined selection) or if they will be processed by another application (for example SQL Maintenance Plan or Oracle RMAN)
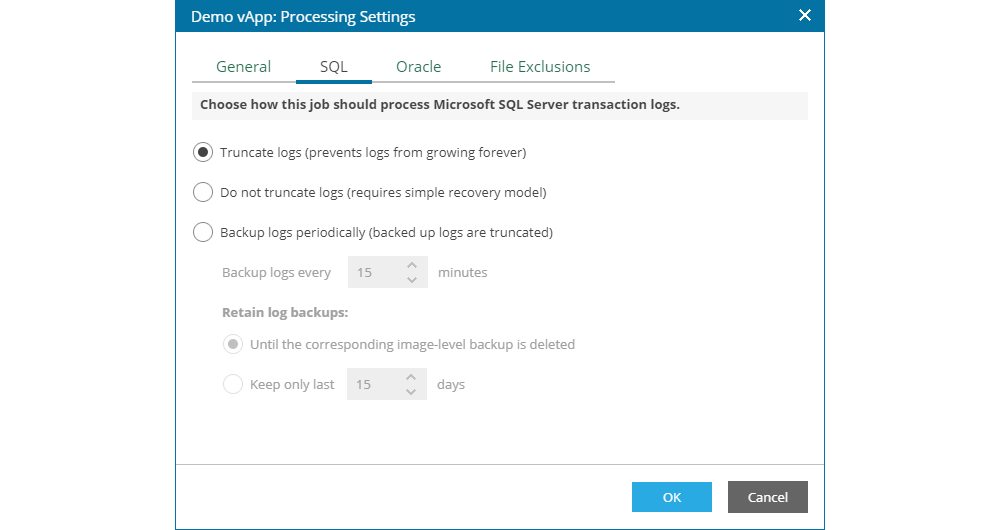
In the SQL tab, the user can configure one of the following options:
- Truncate logs - an option which allows processing of SQL database logs, avoiding their growth. For this option it is necessary for the databases to be configured as Full Recovery Model.
- Do not truncate logs - an option with which SQL database logs are not processed, for which the databases need to be configured as Simple Recovery Model.
- Backup logs periodically - an option which enables regular backup of the transaction log, independent from the virtual machine backup execution. This allows for minimal impact of the SQL databases in case of a failure. The minimal time for transaction log backup is 5 minutes, up to 480 minutes (8 hours). Except for the time for the transaction log backup, the user needs to specify the retention of the transaction log backup. One option is to keep until the active backup chain expires (which in neoCloud's configuration with weekly synthetic fulls would be 7 days). Another option is to specify a strict retention period for the transaction log backup, but it is not recommended for this interval to be more than 7 days.
For successful SQL Server processing, it is necessary for the provided credential for the operating system to have access in the SQL server (a SQL Login with the required privileges, such as backup operator). Assigning SQL level permissions is outside of the scope of the documentation.
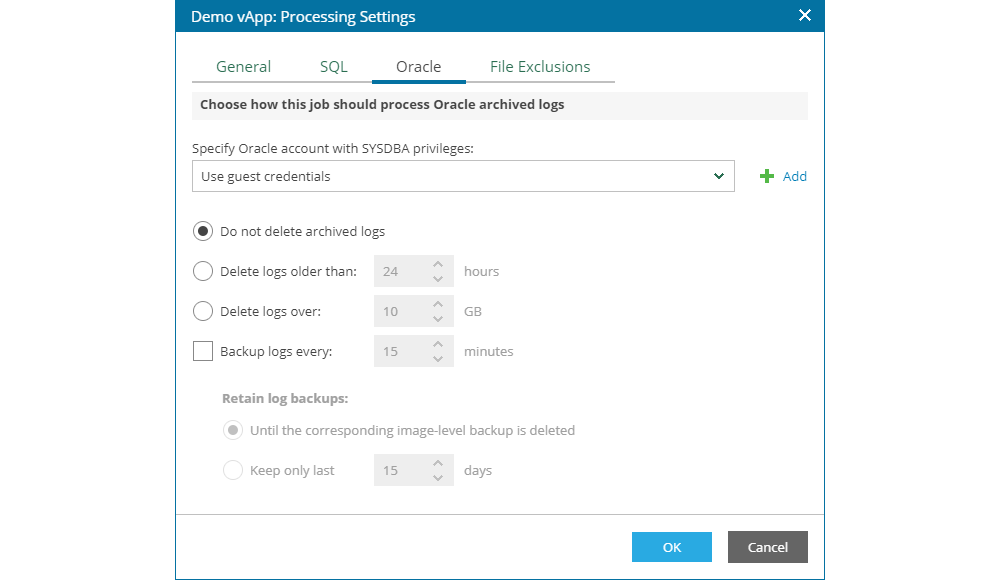
In the Oracle tab, the user can configure the following options:
- Do not delete archived log - an option which defines not to delete the Oracle database archive log
- Delete logs older than - an option for deleting Oracle database archive logs older than a specified number of hours.
- Delete logs larger than - an option for deleting Oracle database archive logs larger than a specified size in GB.
- Backup logs every - an option that enables regular backup of the archive log, independent from the virtual machine backup execution. This allows for minimal impact of the Oracle databases in case of a failure. The minimal time for archive log backup is 5 minutes, up to 480 minutes (8 hours). Except for the time for the archive log backup, the user needs to specify the retention of the archive log backup. One option is to keep until the active backup chain expires (which in neoCloud's configuration with weekly synthetic fulls would be 7 days). Another option is to specify a strict retention period for the archive log backup, but it is not recommended for this interval to be more than 7 days.
For successful SQL Server processing, it is necessary to choose the appropriate login credentials, which can be the same as the operating system if the permissions are assigned to that user or separate credentials which are defined within Oracle. Assigning Oracle level permissions is outside of the scope of the documentation.
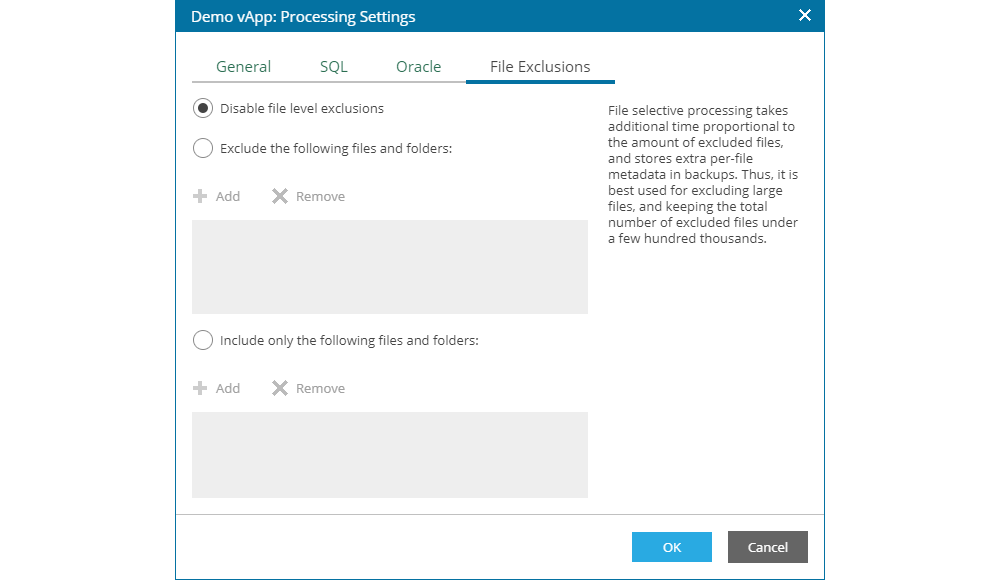
The last tab is this screen allows for excluding specific files and folders from the backup. In the filed for exclusion, the user can input one of the following options:
- Whole path to a folder, for example C:\Documents\
- Whole path to a file, for example C:\Documents\MyReport.docx
- Environmental variables, such as %TEMP%, %windir%
- Using one of the following file masks:
- (*) - replaces one or more characters in the file name or path, for example *.pdf
- (?) - replaces one character in the file name or path, for example repor?.pdf
- (;) - file mask separatort which can be used to enter multiple masks in a string, for example report.*;reports.*.
The file and folder exclusion option is only supported on Microsoft Windows NTFS file system and is recommended to be used on large files and folders (such as pictures, videos and similar data).
If the user selects the option for indexing data in the operating system it is necessary to configure parameters which define which data will be indexed for each virtual application or machine in the backup job. First, the user needs to add the virtual applications or machine to be indexed by clicking the Add VM... and then define specific parameters by choosing the object and clicking the Edit button, as shown on the next image.
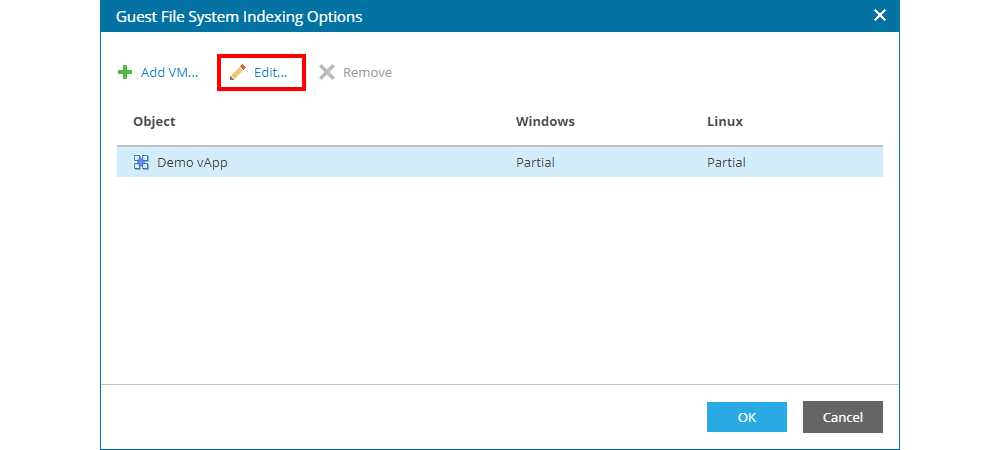
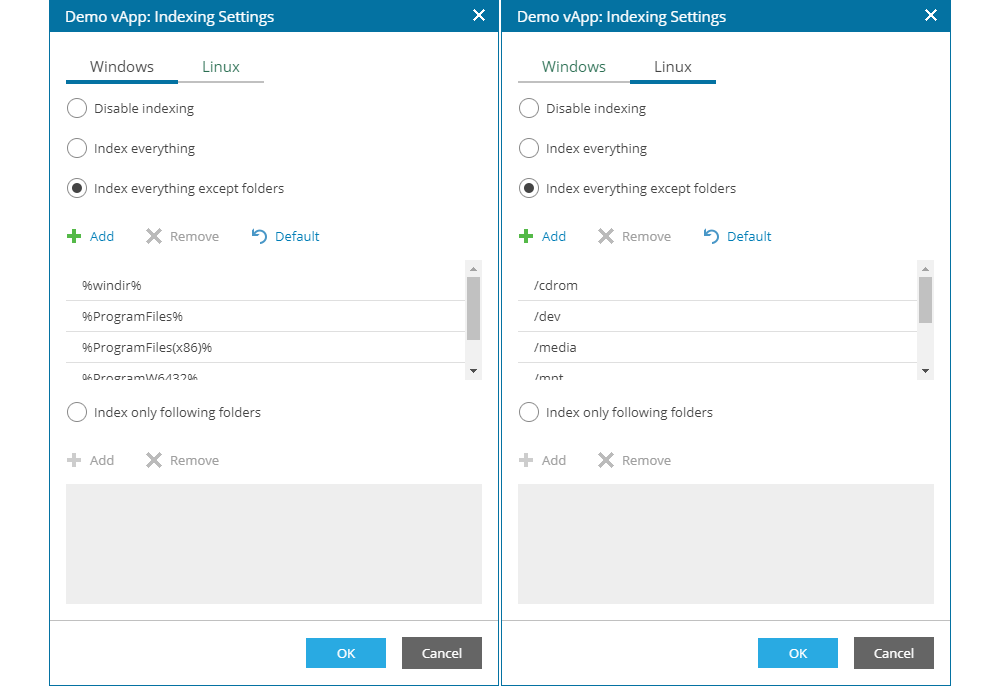
In the windows that opens, the user may define parameter for Windows and Linux based operating systems where data need to be indexed. The options are same at both types of operating systems :
- Disable indexing for turning off indexing for a specific type of operating system, an option used if the job contains both Windows and Linux operating systems and indexing needs to be executed only on one type of operating system
- Index everything to enable indexing for all data in the operating system
- Index everything except folders for indexing all data, except those folder where indexing is not required. This is the recommended option to be used since in the list there are predefined folders and system paths where indexing is indeed not required. This allows for faster job execution
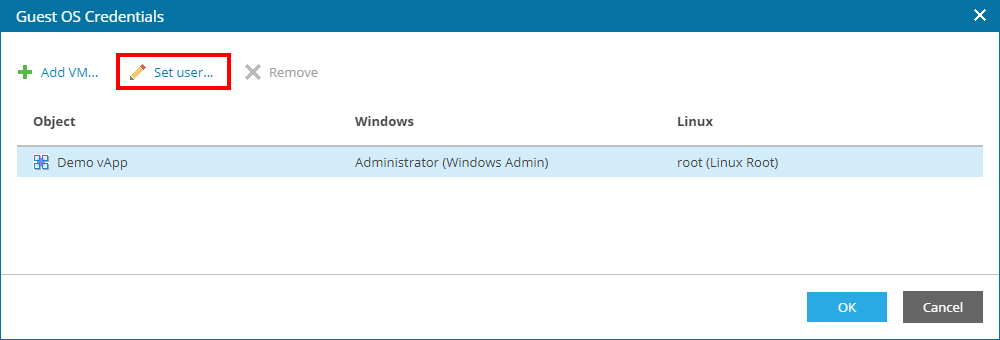
In the field Guest OS Credentials from the Guest Processing screen of the add/edit job wizard, it is necessary to choose login credential for the operating systems and applications that will be processed by the job.
Clicking the + Add button displays two options: Standard Account and Linux Account. The first option is used for entering a username and password and is used for input of login credential for Windows based operating systems. The second option is used for Linux based operating systems, where besides the option to enter a username and password, there is also the possibility to enter the private key of the SSH session and the option to raise privileges of the entered username to a root level during job execution if the username is not a root level user.
Clicking the Edit allows for changing the selected login credentials.

By choosing Customize Credentials a new windows opens there the user can add or remove virtual applications or virtual machines on which login credentials need to be assigned, but it us important that all objects that need application processing and data indexing need to be defined in the list.
The Set User... button allows for setting login credentials for each virtual application or virtual machine in the job if the credentials need to be different, as well as choosing different credentials for Windows and Linux based operating system for each object.
job schedule
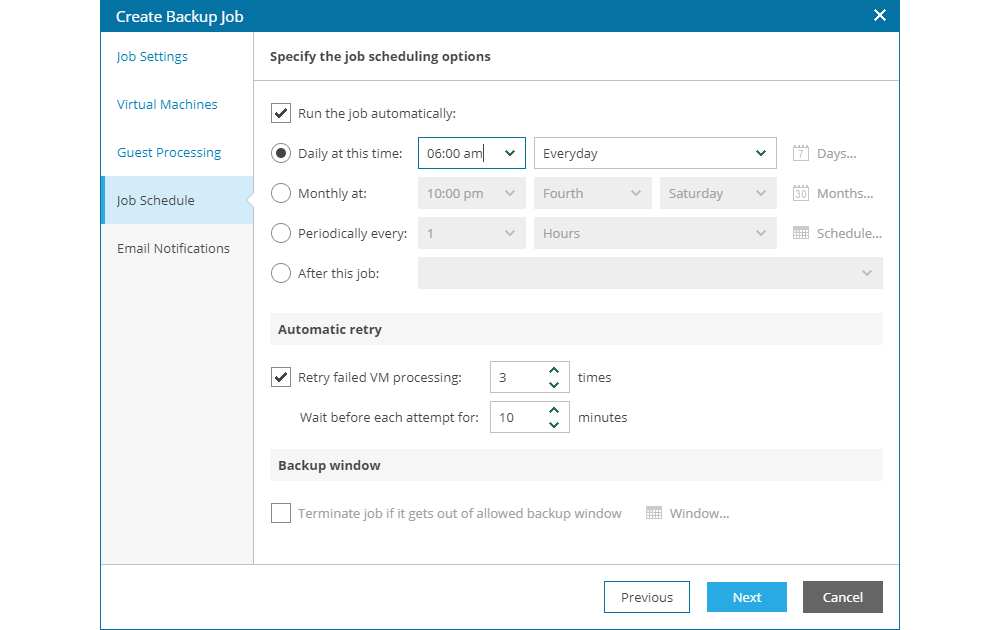
The next step of creating a job is defining the job execution settings, whether the job will execute automatically or of will only be started manually by the user first and foremost. If the option for automatic execution is enabled, the user can choose one of the following options:
- Daily at this time - executing the job in a specific time of the day, with the possibility to choose execution every day, workdays or selecting specific days.
- Monthly at - executing the job monthly by defining the time and day of the month, as well as which moths to execute the job
- Periodically every - executing the job on defined intervals during the day by choosing the minutes or hours for execution or choosing the continuous option, allowing for endless execution (once one execution finishes, another starts)
- After this job - for executing the job once a previously defined job finishes
In most cases, it is recommended to use the first option of the job execution settings while defining the time for execution at the night or after midnight.
In the event that an error occurs during job execution, the user may define for the software to retry the execution. The parameters for 3 retry attempts and wait time between execution of 10 minutes are predefined values.
Finally, if the user selects one of the options for periodically and continuous execution or if the execution need to be terminated because of a critical time of the day for the virtual application or machine, the user may define a Backup windows for the allowed and denied execution time.
E-mail notifications
The last step of the job creation process is to enable the option for notification of the job execution over e-mail. If the user enables this option, they need to enter an e-mail address or a list of e-mail addresses and select the notification conditions. It is recommended that the notification are enabled only when warning or error occurs during job execution, as shown on the following image. The subject of the notification message is predefined and does not need to be changed, unless the user prefers a different subject content.
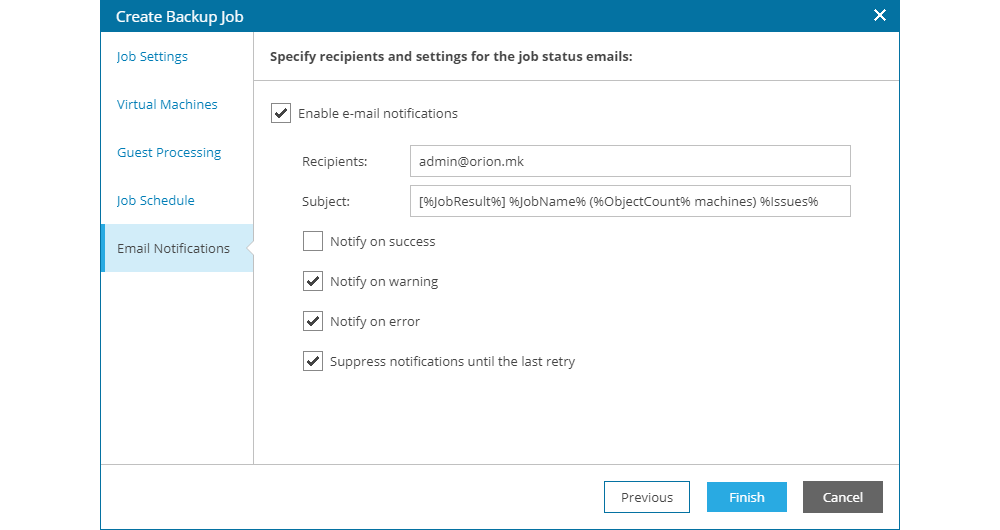
Clicking the Finish button completes the process of creating or editing a backup job.
Status overview and notification
During automated or manual execution of the job, the status of the job changes to Working.
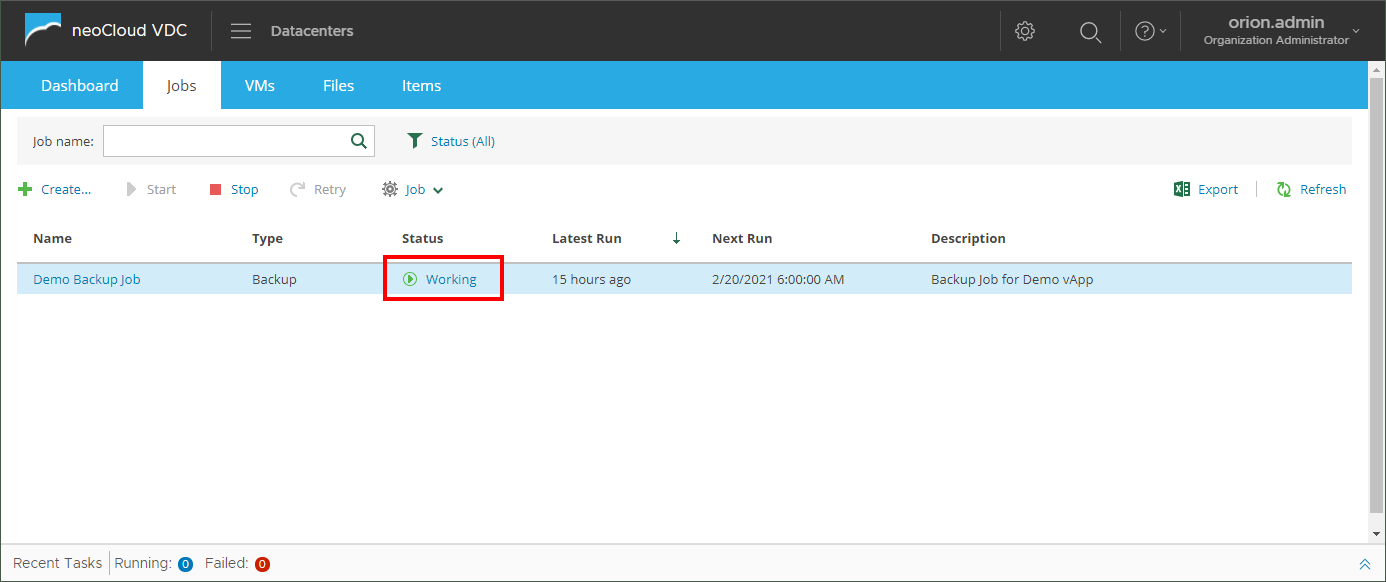
As shown in the page Login and Navigation, this field may be clicked to preview detailed status for the current job execution and all objects that are part of the job.
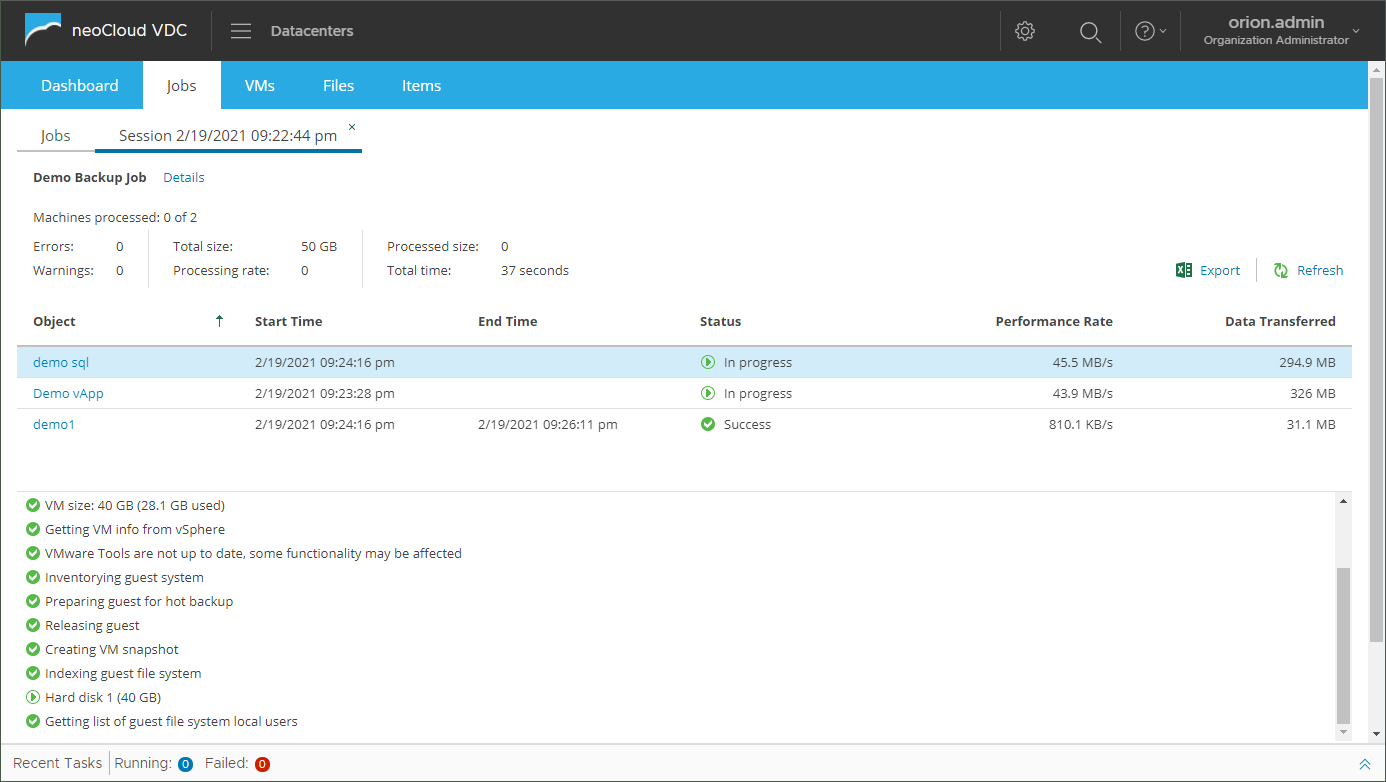
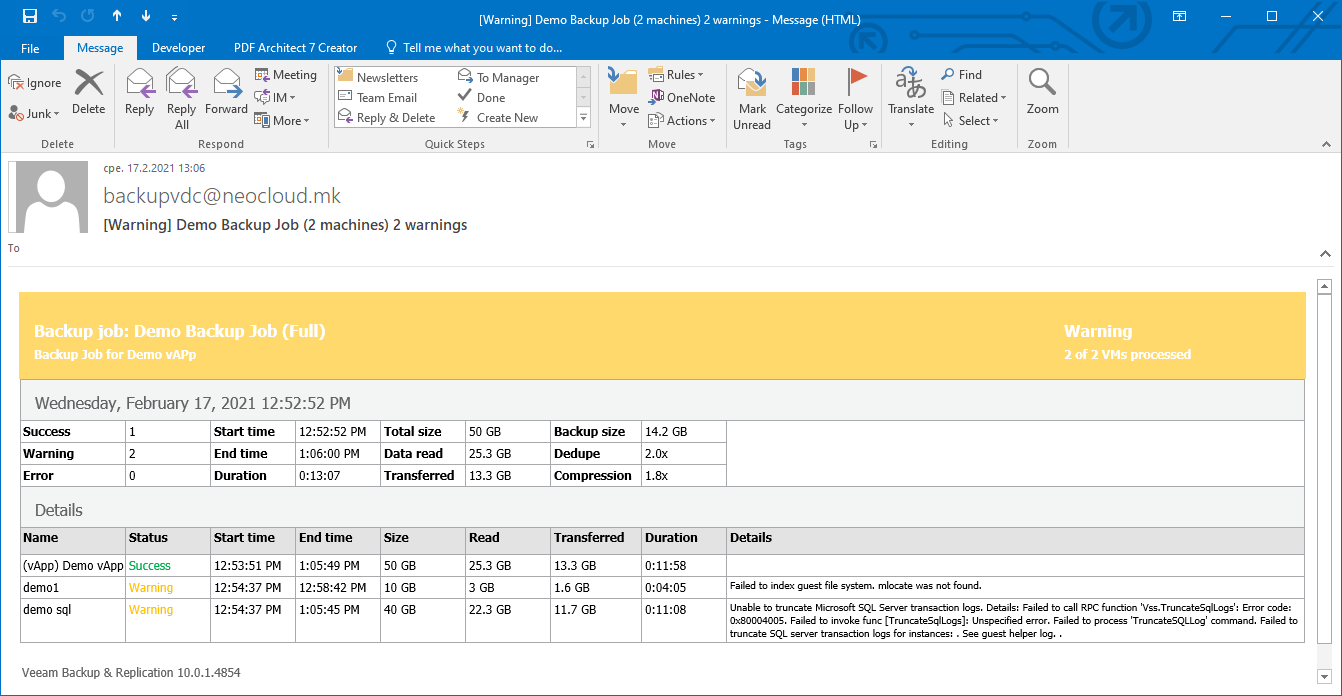
If the option for e-mail notification is enabled, the user will receive a notification as shown in the following image. The message contain all necessary information such as overview of successful and unsuccessful object backup, execution time, different data sizes, as well as detailed diagnostic information if the job executes with a warning or error. These information may help in overcoming the problems in the job execution.
For example, the job execution for the demo1 virtual machines, which is Linux based, shows a warning that the indexing is unsuccessful because the operating system is missing the mlocate package. With the installation of this package, the next execution is successful.
