Installing and Using a SoftEther VPN Client on a Linux Operating Systems
Downloading and Installing a SoftEther VPN Client
Before downloading the software, a suitable directory needs to be chosen. It is recommendable for the software to be installed in the home directory or at /usr/local/.
To download the latest version, use the following command:
wget https://github.com/SoftEtherVPN/SoftEtherVPN_Stable/releases/download/v4.38-9760-rtm/softether-vpnclient-v4.38-9760-rtm-2021.08.17-linux-x64-64bit.tar.gz
To decompress the compressed file, use the following command:
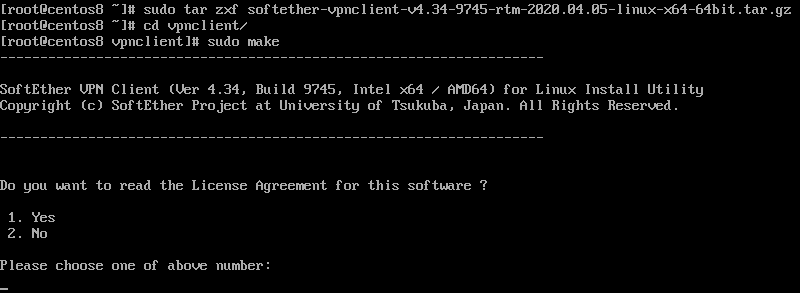
sudo tar zxf softether-vpnclient-v4.38-9760-rtm-2021.08.17-linux-x64-64bit.tar.gz
To change the path in the directory containing the decompressed software, use the following command:
cd vpnclient
To build from the source code, use the following command:
sudo make
Accept the software’s terms of use by selecting the option labelled 1. Yes or 1. Agree under the question.


For increased security of the VPN client settings, we recommend changing the privileges using the following commands:
chmod -R 600 *
chmod 700 vpncmd
chmod 700 vpnclient
cd ..
sudo chown -R root.root vpnclient/
If the user is logged in with and using a different user profile and group, root.root from the last line can be replaced accordingly.
Launch the VPN client using the following command:
sudo ./vpnclient start

Configuring a SoftEther VPN Client
To configure a SoftEther VPN client, use the built-in vpncmd command.
Execute the following command to configure the VPN client:
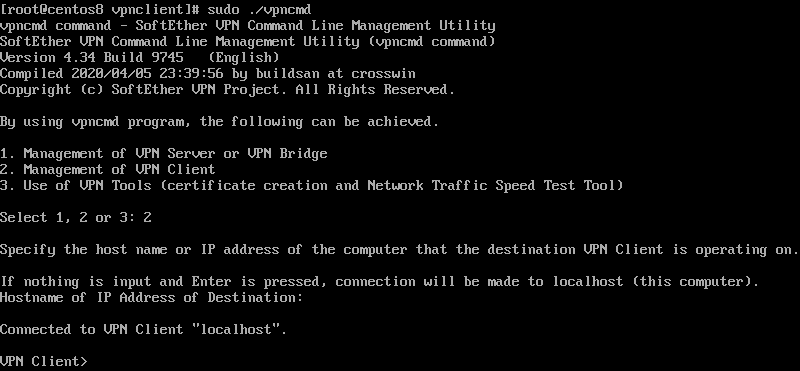
sudo ./vpncmd
Select the option labelled 2. Management of VPN Client, leave the field about connecting to the local VPN client blank, and press Enter.

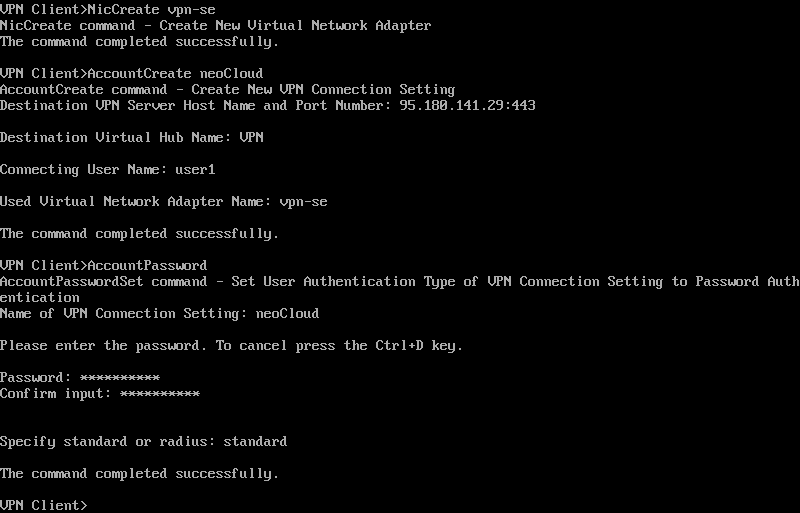
The configuration of the VPN client involves the following steps:
- Creating a virtual adapter:
NicCreate <adapter name>, for example "vpn-se". - Creating a new VPN connection:
AccountCreate <connection name>, for example "neoCloud". - Setting parameters for the VPN server in the field named
Destination VPN Server Host Name and Port Number, for example "95.180.141.29:443". - Entering a name for a Virtual Hub on the VPN server in the field named
Destination Virtual Hub Name, where the predefined Virtual Hub in the template is named VPN. - Entering a user name in the field named
Connection User Name, for example "user1". - Entering a virtual adapter to be used for the VPN connection in the field named
Used Virtual Network Adapter Name, for example "vpn-se". - Creating a password for the VPN connection:
AccountPassword. - Choosing a VPN connection for which the password is to be used, for example "neoCloud".
- Subsequently, the password will need to be entered and confirmed.
- Choosing an authentication type in the
Specify standard or radiusfield. Specify "standard" here.

Alternatively, the same process can be performed with fewer commands provided that all the parameters are set beforehand:
NicCreate <adapter name>
AccountCreate <connection name> /SERVER:<hostname>:<port> /HUB:<hubname> /USERNAME:<username> /NICNAME:<nicname>
AccountPasswordSet <connection name> /PASSWORD:<password> /TYPE:standard
To check a created connection, use the following command:
AccountList
To connect to a VPN connection, use the following command:
AccountConnect <connection name>
To automatically establish a connection, use the following command:
AccountStartupSet <connection name>
The exit command is used to exit the VPN client settings.

Before network communication can be established, the user must check if "ip forward" has been enabled in the operating system, using the following command:
cat /proc/sys/net/ipv4/ip_forward
If the output is 1, the next step can be skipped. If the output is 0, "ip forward" needs to be enabled by making changes in the file named /etc/sysctl.conf.
sudo vi /etc/sysctl.conf
In the aforementioned file, enter the text or remove the comment from the following line:
net.ipv4.ip_forward=1
Afterwards, save the file using the :wq command and check whether the parameter has been successfully set using the sysctl -p command.

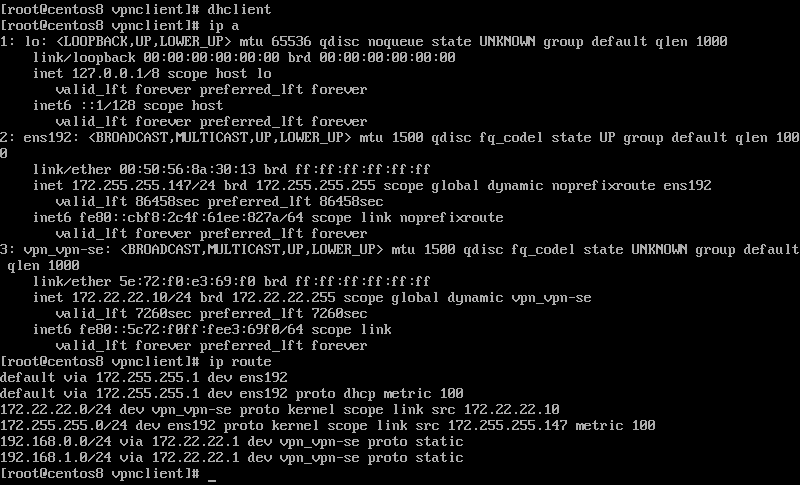
The following command activates the DHCP client to obtain the IP address of the virtual network adapter:
sudo dhclient <adapter name>
To check the obtained IP address and for route assignment (if it is configured on the VPN server), use the ip a and ip route commands.

Connecting using SoftEther VPN Client
Each time the computer/server on which the VPN client is installed is started, the following commands need to be executed for the establishment of a VPN connection:
sudo ./vpnclient start
sudo ./vpncmd
AccountConnect <connection name>
exit
sudo dhclient <adapter name>
The part relevant to connecting to the local VPN client after executing vpncmd, explained above, has been omitted from these commands.
If automatic establishment of the connection through the command AccountStartupSet has already been configured, only the following two commands need to be executed:
sudo ./vpnclient start
sudo dhclient <adapter name>
Terminating a VPN Connection
A VPN connection can be terminated in two ways:
- Stopping the VPN client by executing the
sudo ./vpnclient stopcommand. - Connecting to the local VPN client by using the
sudo ./vpncmdcommand and then executingAccountDisconnect <connection name>.
Upgrading a SoftEther VPN Client
An upgrade of a SoftEther VPN client is performed in much the same way as the installation process. The user needs to choose whether the new version is to be installed on a new path or on the same one. In either upgrade scenario, the vpn-client.conf file needs to be saved and then transferred onto the path of the new version of the client.
